

If you want to improve your scheduling process, you've probably heard about Calendly. This American tool has become one of the most popular scheduling tools, helping millions of people and businesses get rid of email chains to set up meetings. Regardless if you're a freelancer, part of a sales team, or if you're running a busy company, knowing how to use Calendly well can save you countless hours.
In this guide, we'll show you how to use Calendly easily—from setting up the account for basic use, to more scheduling features. But that's not everyhing—after that, we'll also introduce you to Zeeg, an alternative with advanced scheduling and strong compliance and security features that you can use
First, how does Calendly work?
Calendly is a scheduling platform that tries to get rid of those email chains usually needed to find meeting times. Instead of writing "When works for you?" followed by more and more emails, Calendly lets you share a booking page showing your availability. It integrates with your calendar apps (like Google Calendar or Microsoft Outlook) to check for your availability; then, when someone visits your Calendly booking page (which can be done in different ways), the system checks your calendars in real-time, and displays only the times when you don't already have commitments. Your recipients can simply choose a convenient time slot, and the meeting gets automatically added to everyone's calendars.
Essentially, Calendly acts as an automated scheduling assistant that connects to your existing calendars and only shows times when you're actually available. It goes like this:
- You define when you're available for specific types of meetings
- You share your unique Calendly booking link with others
- Recipients select a time that works for their schedule
- The meeting is automatically added to everyone's connected calendars
Quick start: How to use Calendly to schedule meetings in 5 minutes
If you just need to know the basics about working with Calendly, here's a step-by-step to get you set quickly:
Step 1: Create your account
- Visit calendly.com and click "Sign up" or sign up with email
Step 2: Connect your calendar
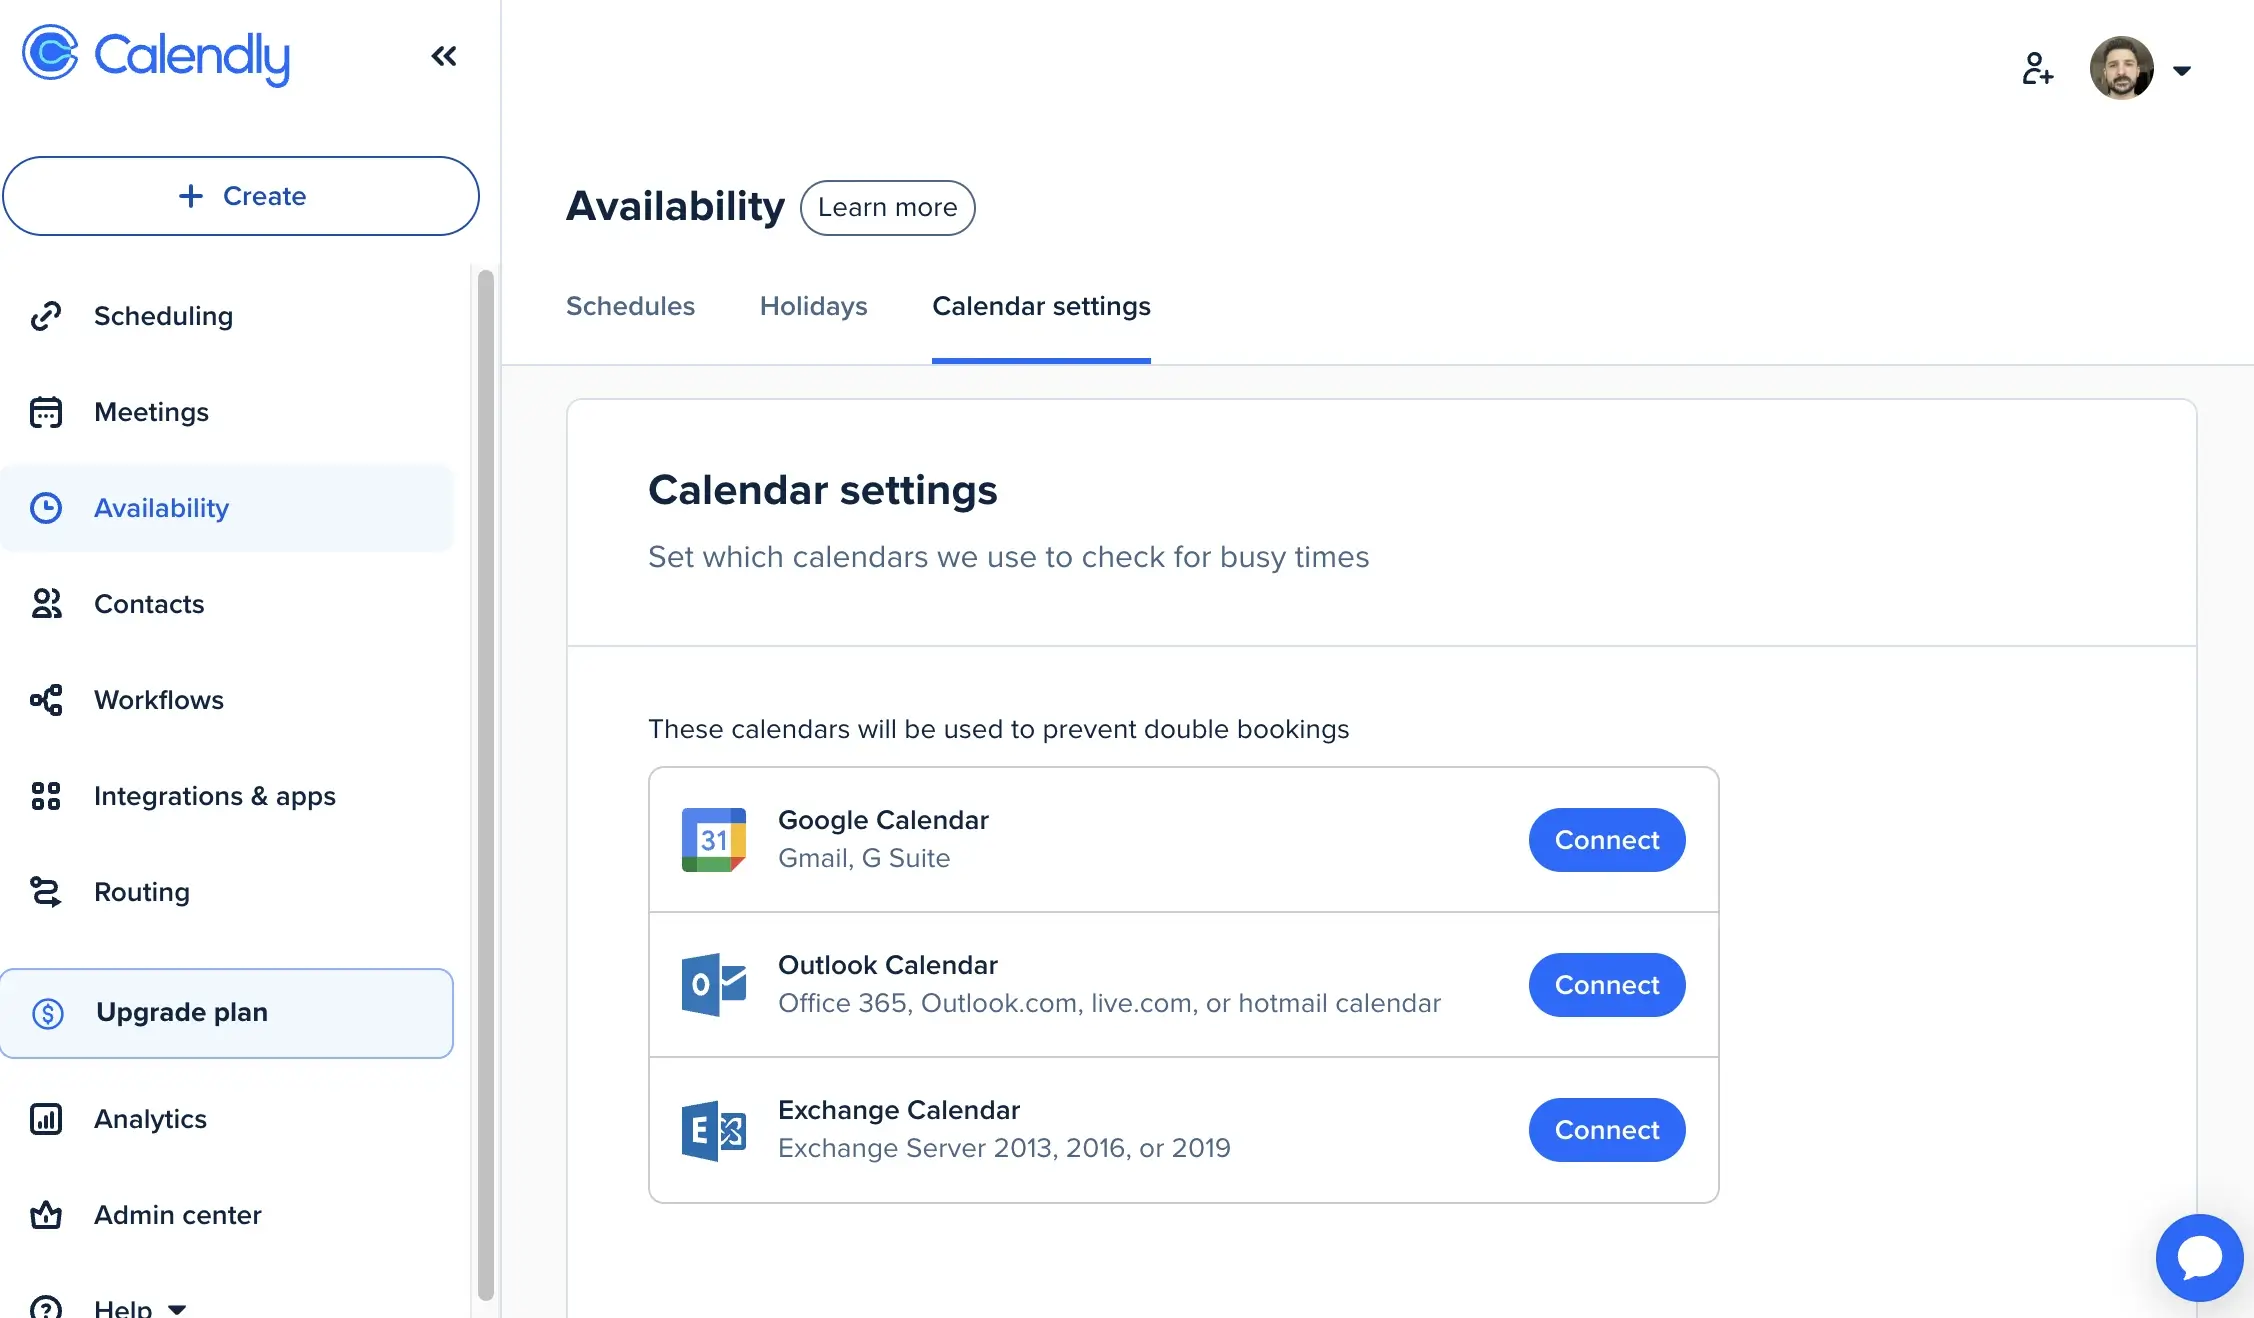
- Under Availability or Integrations & apps, on the left, you can choose your preferred calendar app to connect with, and follow the prompts. Link your Google Calendar, Outlook, or Exchange Calendar (Apple icloud calendar is unavailable). This prevents double-bookings automatically.
Step 3: Set up your first meeting type
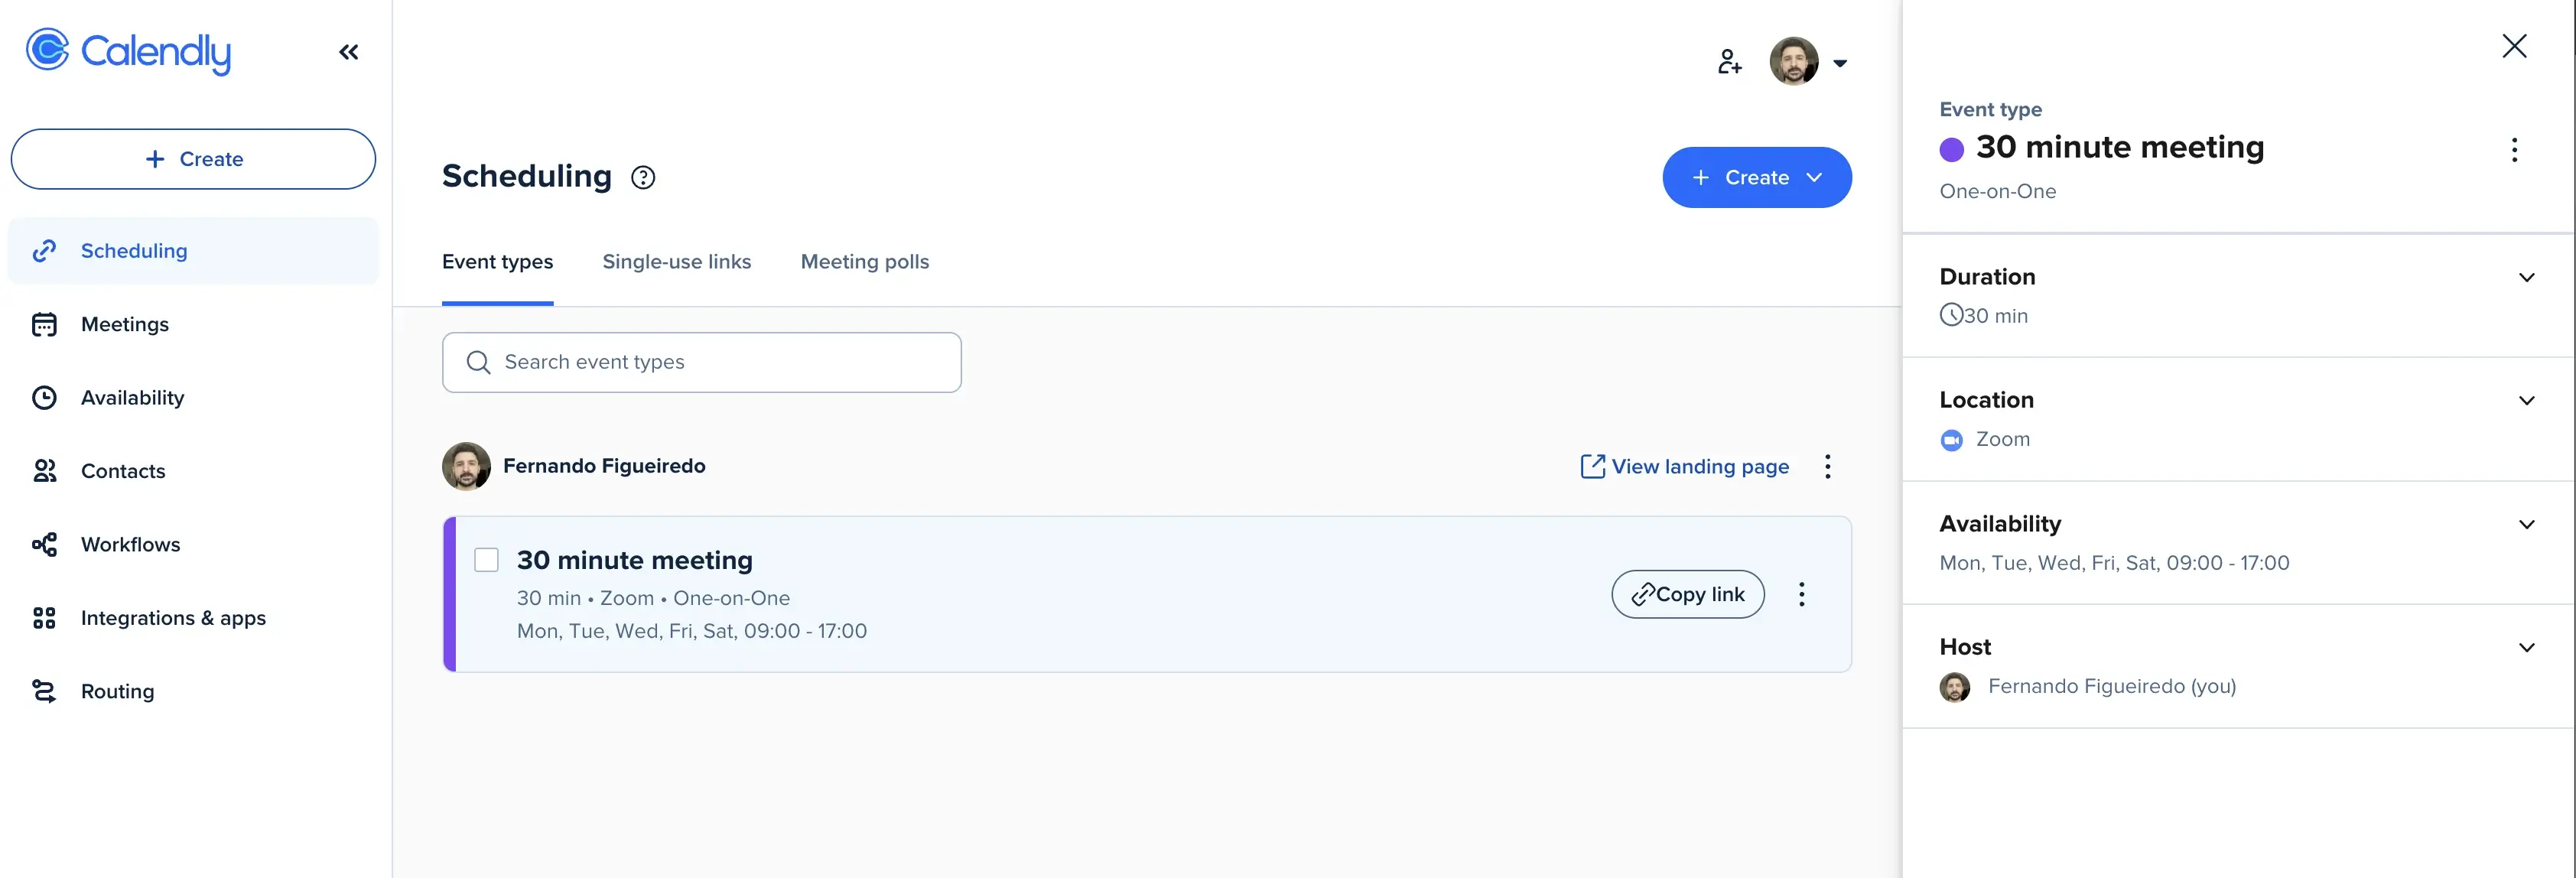
- Click on Scheduling, on the left menu, and then hit create
- You can then choose the type of meeting you want to have
- You'll be able to edit the name your meeting (e.g., "30 minute meeting"), set duration and location (in-person, phone, or video), and choose your available hours
Step 4: Share your link
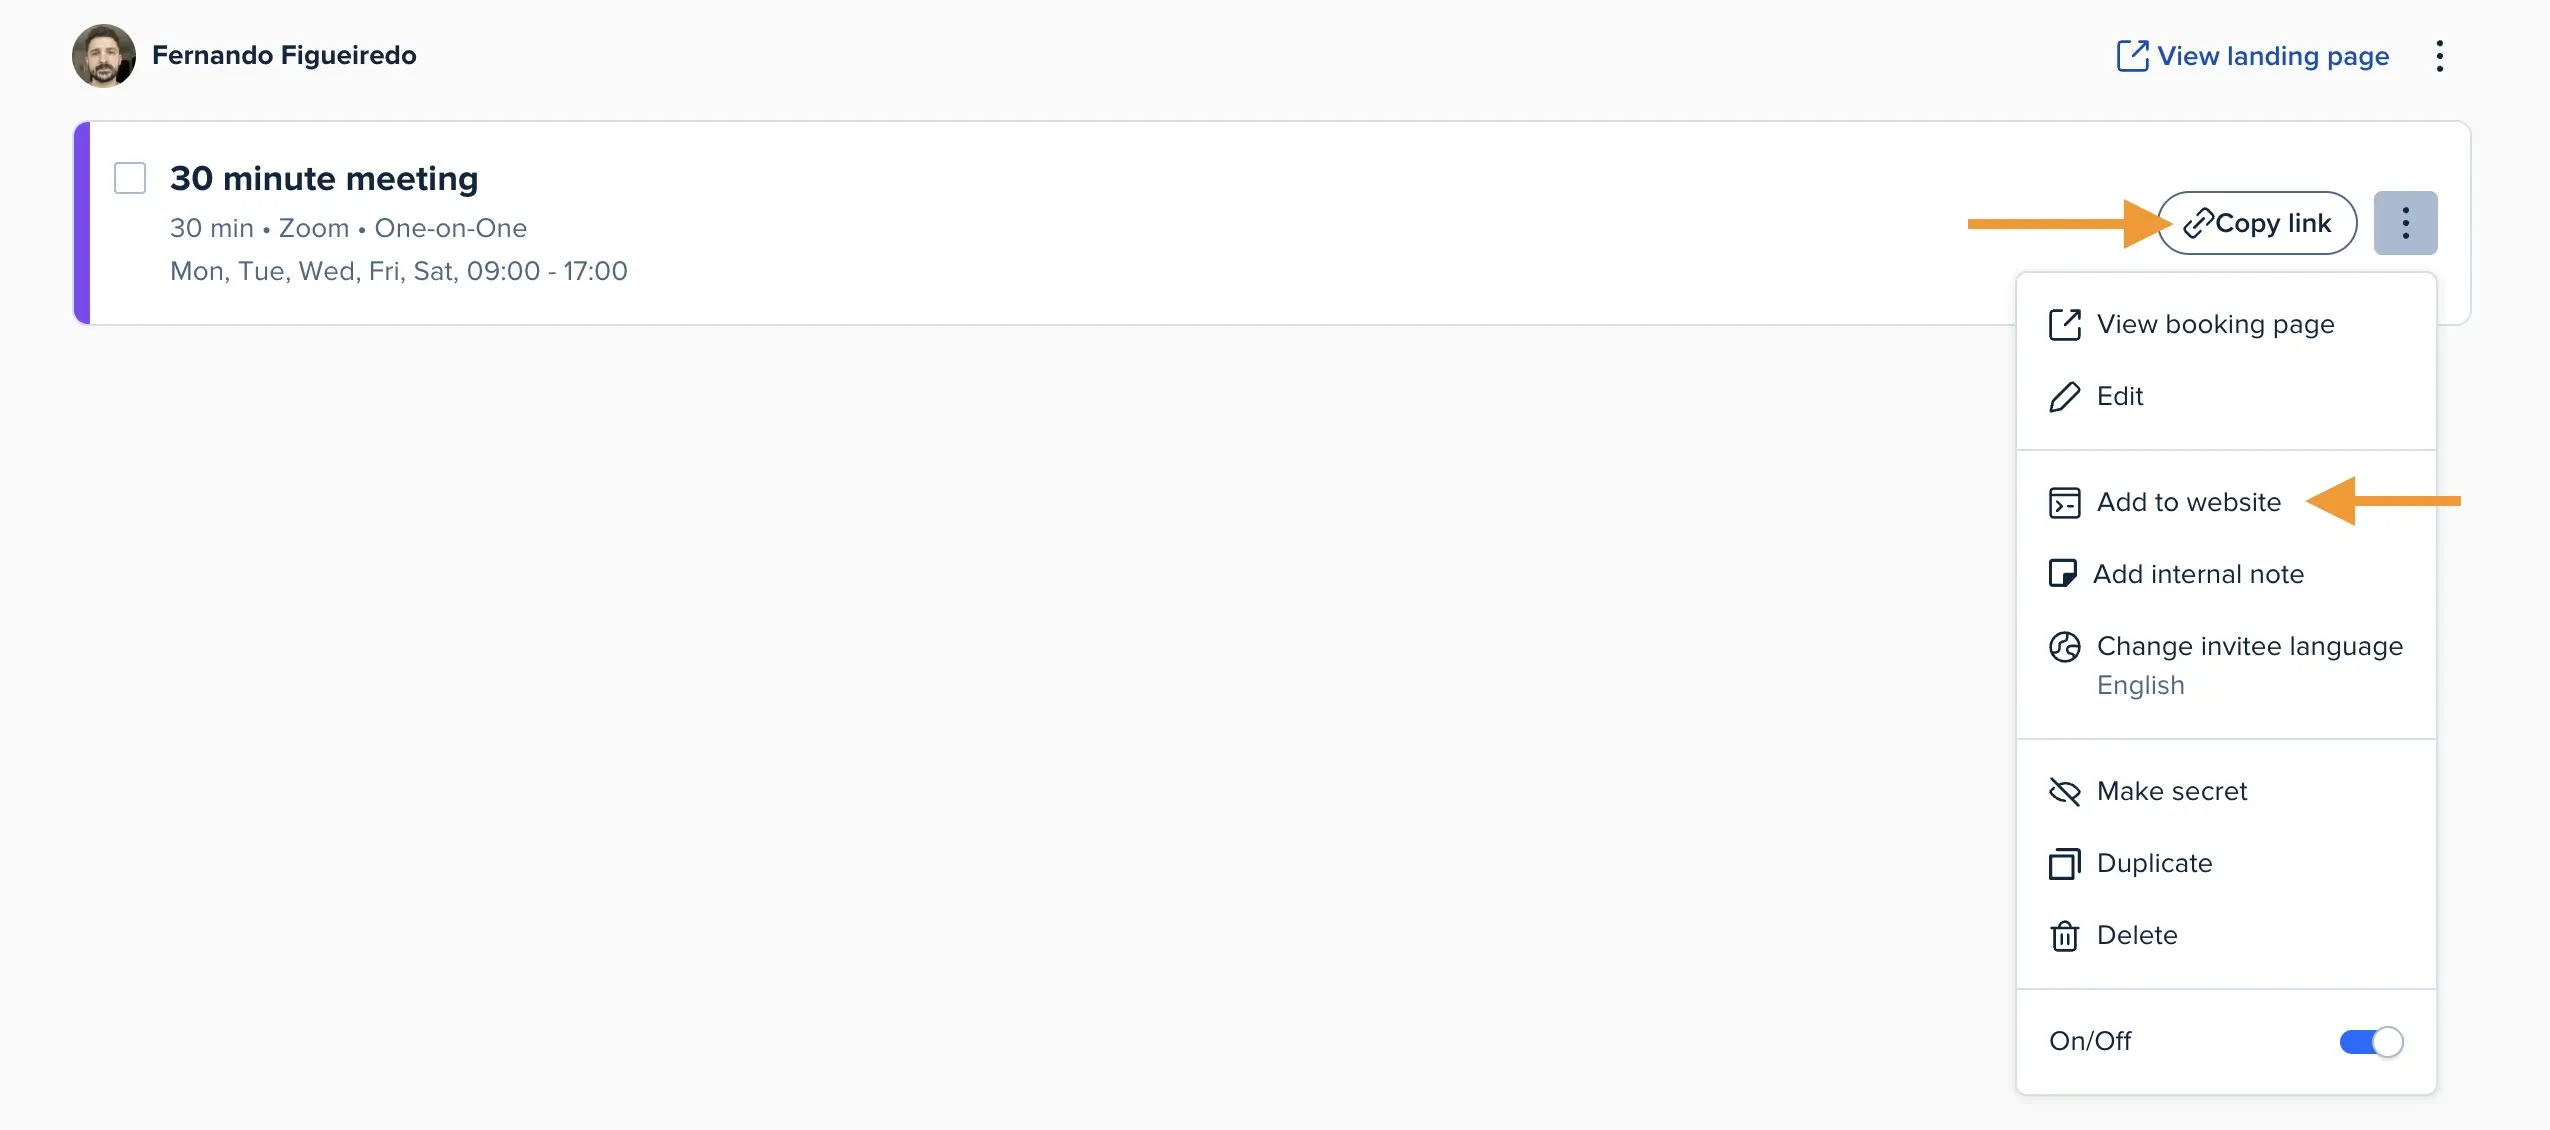
- From the same menu with the scheduling page, you can just copy the booking link and send it to anyone. Share via email, text, or social media. However, if you click on the three dots and select "Add to website", you can also embed it inline into your website, add a popup widget or some link text that opens a float pop-up button.
And that's it—people will the be able to book with you immediately!
How to use Calendly: Step-by-step
1. Define your availability preferences
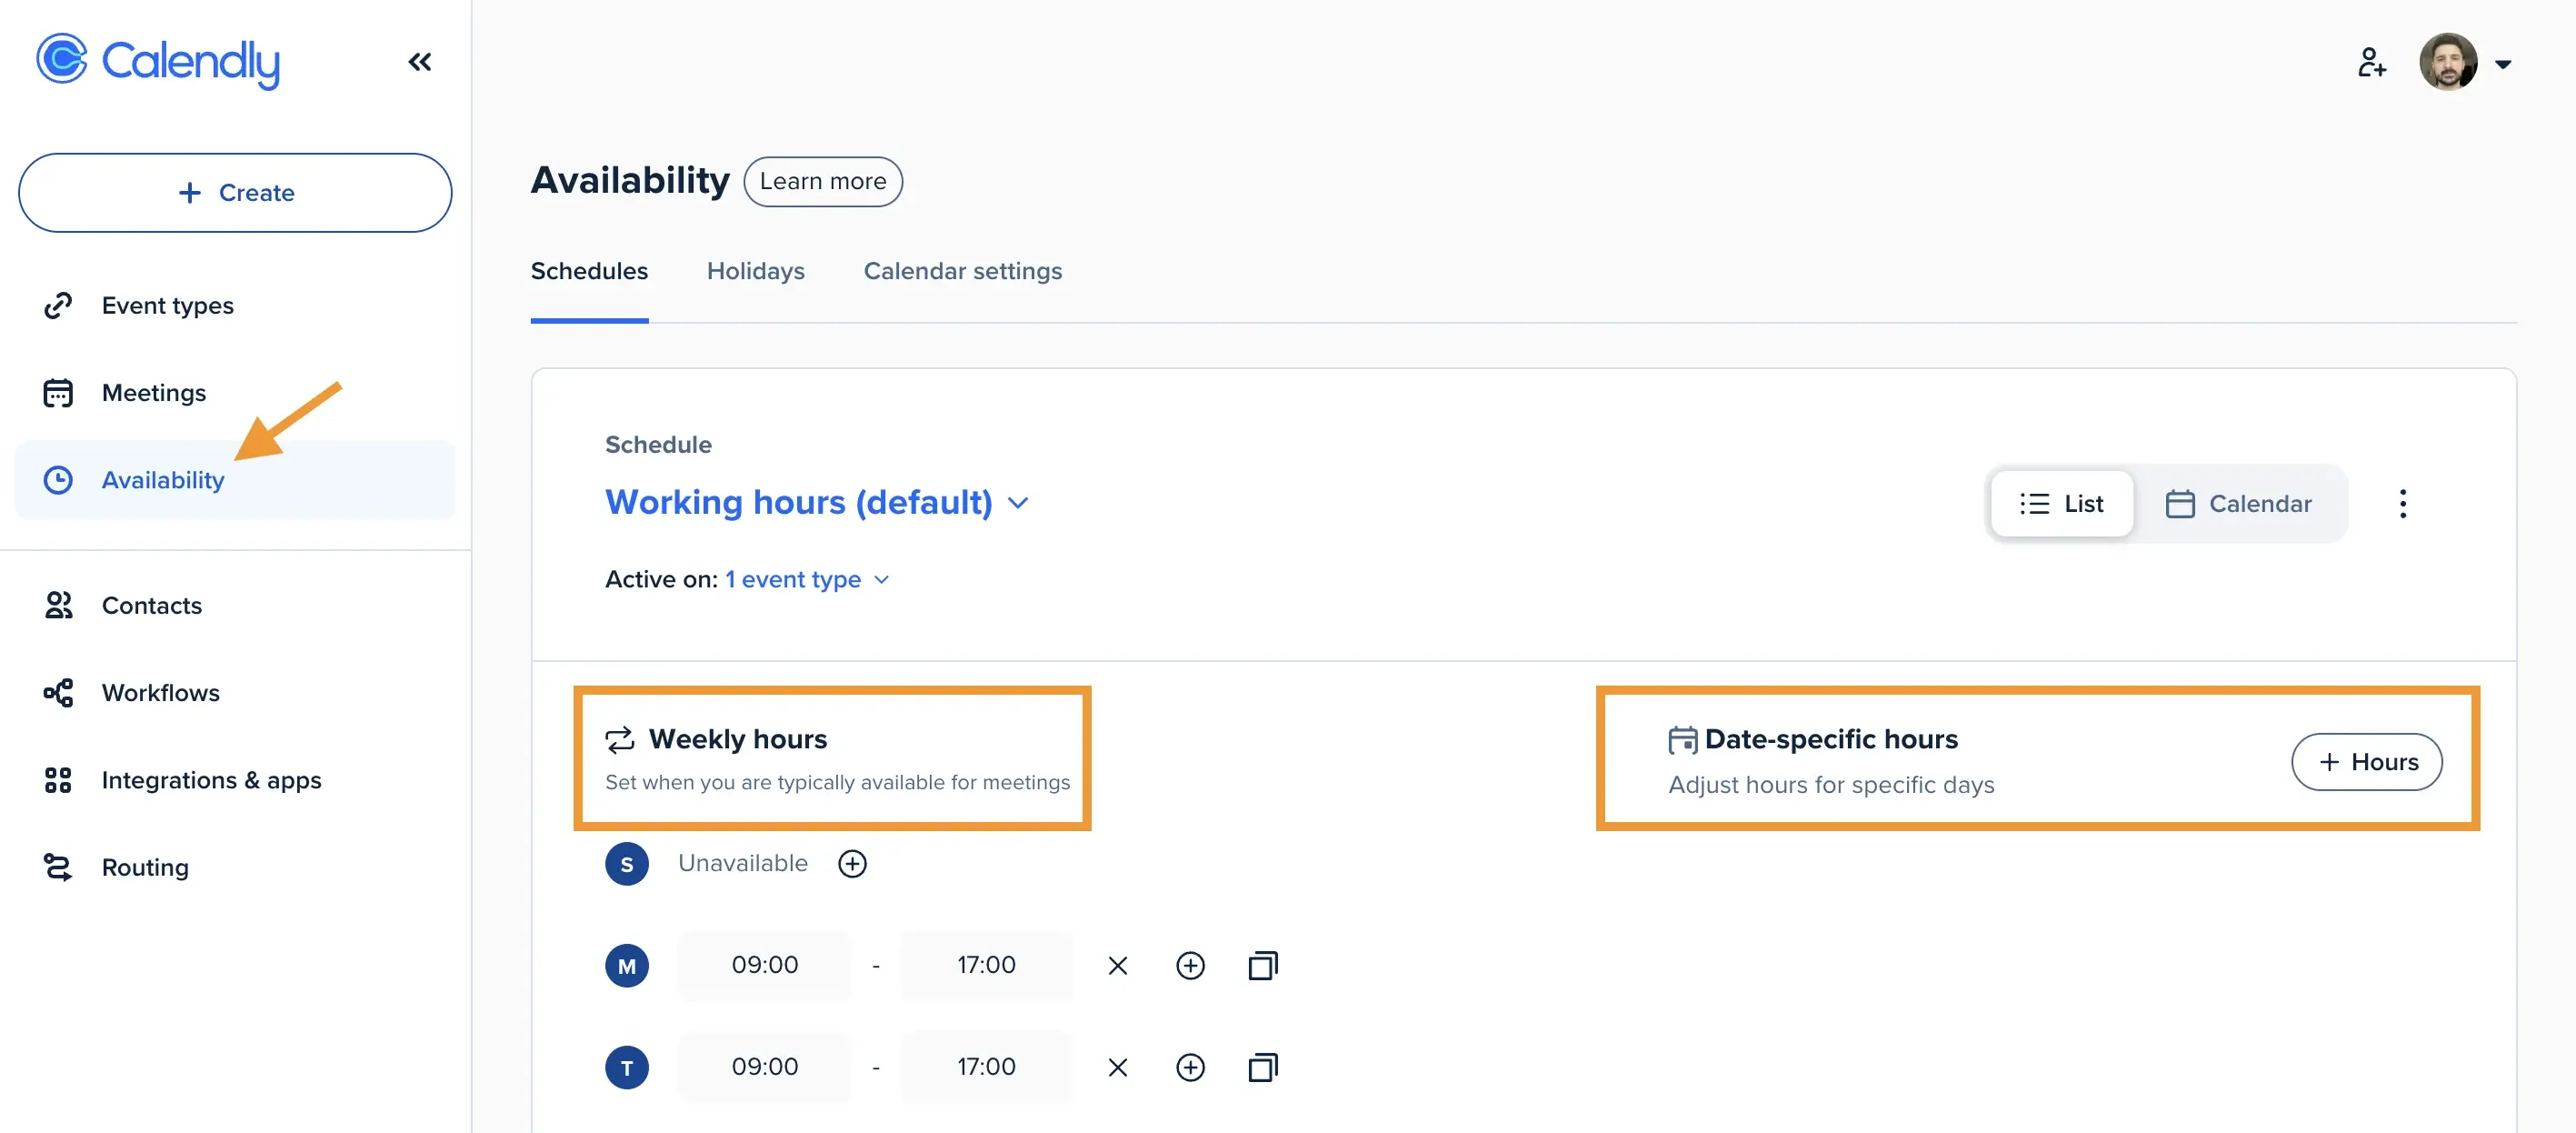
After creating your account, you'll need to configure when you're available for meetings. Of course that you can just trust the integration with your own calendar, but if you want to add other rules, then definitely do this step. For example, maybe you want to block your calendar everyday from 12 pm to 2 pm.
So, setting up your availability basically means defining your working hours for each day of the week, and specifying your preferred meeting times. By default, the tool sets Monday through Friday from 9 AM to 5 PM as your working hours, but only allow meetings between 10 AM and 4 PM to give yourself buffer time at the beginning and end of each day. But of course that you can re-define this.
You can also set date range limits to control how far in advance people can book meetings with you.
👉 It's also possible that you encounter availability issues on Calendly when using it. If that's the case, you should use Calendly troubleshooting tool.
👉 The free Calendly plan only allows connection to one calendar, while paid plans support up to six calendar connections. This multi-calendar support is especially valuable if you maintain separate work and personal schedules.
2. Set up your video conferencing integration
.webp)
For virtual meetings, connecting your video conferencing tool is essential:
- Go to "Integrations & apps" in your Calendly dashboard
- You can then write the tool you want to connect with (Zoom, Google Meet, Microsoft Teams, etc.) and follow the prompt
- Follow the authentication steps to connect your account
- When creating or editing an event type, select your connected platform as the location
With this integration in place, Calendly will automatically generate a unique meeting link for each booking and include it in calendar invitations.
3. Build your first event page (and link)

Event types are the foundation of how Calendly works. Think of them as meeting templates that define the purpose, duration, and settings for different kinds of Event types are the foundation of how Calendly works. They're like those meeting templates that define the purpose, duration, and settings for different kinds of appointments. But then let's explore how to create your Calendly scheduling link:
First, look at the different event types in Calendly
Once you've created your basic event type, you can customize it further. On your scheduling page, click on the three dots, and select Edit.
Then, you can edit what you wish from these options:
- Description to give to your scheduling page
- Buffer times and maximum booked meetings
- Add meeting exceptions on blocked slots
- Slug of your page URL and timezone (under booking page options)
- Question forms to as your guest and possibility for invitees to add more guest
- Payment per meeting (at the time of booking)
- Reminders, other notification workflows and confirmation page when meeting is booked
4. Share your Calendly link

Once you've set up your event types, it's time to share them with potential invitees, and there’s many options to do so. And the simplest way to share is by copying and sending your link:
- From your Event Types page, find the event you want to share
- Click "Share" next to the event
- Select "Copy Link" to get your event's URL
- Paste the link in your email, messaging app, or social media post
When sharing your link, it's helpful to include context about the purpose of the meeting to encourage bookings.
Create a single-use link
For specific invitees, you can create a single-use link:
- Click "Share" next to your event type
- Select "Share a link"
- Toggle on "Let this link expire after first booking"
- Copy and share the generated link
This ensures the link can only be used once, which is useful for specific individuals rather than general availability.
Add available times to an email
Rather than sharing your full calendar, you can offer specific times:
- Click "Share" next to your event type
- Select "Add times to email"
- Choose dates and times you want to offer
- Copy the generated text and time buttons
- Paste into your email
This approach gives invitees a more directed set of options while still using Calendly's scheduling capabilities.
Embed Calendly on your website
For consultants, freelancers, and businesses, embedding Calendly on your website can definitely improve bookings:
- Click "Share" next to your event type
- Select "Add to website"
- Choose your preferred embed option:
- Inline embed (full calendar on your page)
- Popup widget (button that opens Calendly when clicked)
- Popup text (text link that opens Calendly)
- Customize the display settings
- Copy the generated code
- Paste the code into your website's HTML
This integration allows visitors to book time with you directly from your website without being redirected.
👉 You can also share your booking link through the Calendly QR code feature.
5. Manage your schedule and appointments efficiently

Once your Calendly account is set up and you begin receiving bookings, you'll need effective ways to manage your schedule. Calendly provides several tools to help you stay organized and respond appropriately when plans change.
Access your appointment dashboard
Calendly centralizes all your scheduled meetings in one convenient dashboard. Instead of checking multiple calendars or email confirmations, you can view your complete schedule in a single location:
- Log into your Calendly account dashboard
- Click on the "Meetings" on the left menu
- View all your upcoming, past and pending appointments in chronological order
- Filter meetings by event type, date range, or status for better organization
- Access detailed meeting information including invitee data and responses to any questions you configured
This centralized view gives you complete visibility into your appointment schedule across all your event types. You can quickly identify busy periods, prepare for upcoming meetings, and track your scheduling history over time.
Respond to cancellations and rescheduling requests
Plans change, and Calendly makes it simple to handle schedule adjustments gracefully. Rather than exchanging multiple emails to find a new time, the platform provides automated tools for both you and your invitees:
For you to initiate changes:
- Locate the meeting in your Scheduled Events dashboard
- Click "Cancel" to remove the appointment entirely
- Select "Reschedule" to suggest new time options
- Follow the prompts to complete the process and notify the invitee
For invitee-initiated changes:
- They click the cancellation or rescheduling link in their confirmation email
- For cancellations, they provide a reason (optional) and confirm
- For rescheduling, they select a new time from your available slots
- Both parties receive updated calendar invitations automatically
To set clear guidelines around schedule changes, you can customize your cancellation and rescheduling policies in your event settings. For example, you might allow rescheduling up to 24 hours before the meeting but disable cancellations within 48 hours. These policies help manage expectations and reduce last-minute disruptions.
6. Automate your meeting workflow

One of Calendly's most powerful features is automation, which can save you considerable time on routine tasks:
Set up automated reminders
To reduce no-shows and keep everyone prepared:
- Go to "Workflows" in your dashboard
- Select "Create new workflow"
- Choose "Email reminders" or "Text reminders"
- Configure when reminders should be sent (e.g., 1 day before the meeting)
- Customize the message content
- Select which event types should use this workflow
- Activate the workflow
Automated reminders help ensure that both you and your invitees remember scheduled meetings.
Create custom follow-up messages
For post-meeting communication:
- In "Workflows," select "Create new workflow"
- Choose "Thank you emails" or "Follow-up emails"
- Set when the message should be sent (e.g., 1 hour after the meeting)
- Customize the content with relevant information or next steps
- Apply to your desired event types
- Activate the workflow
These automated follow-ups maintain momentum after meetings without requiring manual work.
Connect Calendly to other tools
Extend Calendly's functionality by connecting it to other applications:
- Go to "Integrations & Apps" in your dashboard
- Browse available integrations or search for specific tools
- Common integrations include:
- CRM systems (Salesforce, HubSpot)
- Marketing tools (Mailchimp, ConvertKit)
- Payment processors (Stripe, PayPal)
- Project management (Asana, Trello)
- Follow the authentication steps for each integration
These connections allow information to flow between Calendly and your other tools, creating a more seamless workflow. You can read about a few of Calendly integrations here:
- Calendly for Outlook
- Calendly for Teams
- Calendly Salesforce integration guide
- Calendly Hubspot integration guide
- Calendly Pipedrive integration guide
7. Set up team scheduling in Calendly

For organizations and teams, Calendly offers powerful collaborative scheduling features:
Invite more team members
To set up team scheduling:
- Upgrade to a Teams or Enterprise plan
- Go to "Organization" in your dashboard
- Select "Invite Users"
- Enter email addresses for team members
- Assign appropriate roles and permissions
- Send invitations
Team members will receive emails with instructions to join your Calendly organization.
Creating team event types for collaborative scheduling:
- Go to your organization settings
- Select "Event Types" and then "+ Team Event Type"
- Choose the appropriate team event format:
- Collective (multiple hosts meet with one invitee)
- Round Robin (meetings distributed among team members)
- Group (one host meets with multiple invitees)
- Configure the event settings
- Select team members who can host this event
- Save the team event type
These collaborative event types help teams work together more efficiently and distribute meetings fairly.
Set up round-robin distribution
To equitably distribute meetings among team members you should use Calendly round robin feature:
- Create a Round Robin event type
- Select team members to include in the rotation
- Choose how meetings should be assigned:
- Based on availability (first available team member)
- Based on equal distribution (balancing workload)
- Based on priority (ordered list)
- Set notification preferences for assigned team members
- Save and share the Round Robin link
This feature is particularly useful for sales teams, support teams, and other groups that need to divide incoming meeting requests.
8. Use Advanced Calendly features

As you become more comfortable with Calendly, you might want to explore some of its advanced features:
Collect payments for bookings
If you charge for your time or services:
- Set up a payment integration (Stripe or PayPal)
- Edit your event type settings
- Enable the payment option
- Set your price and payment details
- Customize the payment description
- Save your settings
Invitees will need to complete payment before their booking is confirmed, streamlining your collection process.
Use scheduling polls for group coordination
When coordinating with multiple participants:
- Create a Meeting Poll
- Set potential meeting times
- Customize poll settings
- Share the poll with participants
- Participants vote on their preferred times
- Finalize the meeting based on votes
This feature helps find optimal meeting times when scheduling with multiple busy individuals.
Customizing your Calendly branding
To present a more professional image:
- Go to your account settings
- Select "Branding"
- Customize colors to match your brand
- Add your logo
- Adjust the booking page layout
- Save your branding settings
Note that some branding features require paid plans, but they can help create a more cohesive experience for your invitees.
Create secret event types
For exclusive or private meeting options:
- Create a new event type
- Go to advanced settings
- Toggle "Hide this event type"
- Save your settings
Secret event types won't appear on your public Calendly page but can be shared directly via their specific links.
👉 Learn about advanced features on Calendly:
9. Manage Calendly settings and account management

Properly managing your Calendly settings ensures the platform works optimally for your needs:
Profile settings
Customize your personal information:
- Go to "Account" and then "Profile"
- Add a profile picture or logo
- Update your display name
- Customize your Calendly URL
- Add your time zone
These settings affect how you appear to invitees across all your event types.
Notification preferences
Control how you're informed about bookings:
- Go to "Account" and then "Notifications"
- Choose which events trigger notifications
- Select your preferred notification methods (email, SMS)
- Customize notification content
- Set calendar invitation preferences
Proper notification settings ensure you're always informed about your schedule changes without being overwhelmed.
Subscription management
If you're using a paid plan:
- Go to "Account" and then "Billing"
- View your current subscription details
- Manage payment methods
- Upgrade or downgrade your plan as needed
- Access billing history and invoices
Understanding your subscription options helps you get the most value from Calendly.
10. Use the browser extensions for quick scheduling

To streamline your scheduling process further, Calendly offers browser extensions:
Installing Calendly for Chrome
- Go to the Chrome Web Store
- Search for "Calendly for Chrome"
- Click "Add to Chrome"
- Complete the installation process
- Sign in to your Calendly account
Similar extensions are available for Firefox, Edge, and other browsers.
Using the extension for quick scheduling
With the extension installed, you can:
- Access your Calendly links directly from your browser toolbar
- Insert scheduling links into emails without switching tabs
- Schedule meetings while browsing LinkedIn or other platforms
- Create one-off meetings with custom settings
- Override your standard availability for specific meetings
The extension makes Calendly even more convenient by integrating it directly into your browsing experience.
11. Choose one of the pricing plans
Once you've tried the main functions on Calendly, for which you'll have 14 days to do so for free, it's time to choose a pricing plan. So let's have a quick look at Calendly pricing plans:
👉 Read more about Calendly pricing plans:
Want a safe, advanced and cost-effective alternative? Meet Zeeg.
While Calendly is a popular scheduling tool, it's worth exploring alternatives like Zeeg, especially if you have specific needs around data privacy, Apple Calendar integration, or cost-effectiveness.
Why consider Zeeg as a Calendly alternative

Zeeg offers several advantages that may make it a better fit for your needs:
- Full GDPR compliance: Zeeg stores data on European servers with end-to-end encryption, providing stronger privacy protections compared to Calendly's US-based servers.
- Apple Calendar integration: Unlike Calendly, which discontinued new Apple Calendar integration in 2024, Zeeg maintains native Apple Calendar support.
- Generous free plan: Zeeg offers two scheduling pages on its free plan (vs. Calendly's single page).
- Similar interface and functionality: If you're familiar with Calendly, Zeeg has a comparable user experience but with enhanced features.
For businesses operating in Europe or with European clients, Zeeg's GDPR compliance can be a significant advantage. Similarly, Apple users may prefer Zeeg's native calendar integration.
Explore Zeeg, the best alternative to Calendly, and all its scheduling features you need plus additional benefits.
Frequently asked questions about Calendly
How does Calendly work with Google Calendar?
Calendly connects directly to your Google Calendar to check your existing schedule for conflicts, block off times when you're already busy, add new bookings to your Google Calendar automatically, and update your availability in real-time.
👉 Learn more about how to sync Calendly with Google Calendar.
Is Calendly a video conferencing tool?
Calendly itself is not a video conferencing platform, but it integrates with popular video conferencing tools like Zoom, Microsoft Teams, and Google Meet. When someone books a meeting, Calendly can automatically generate a video conference link using your connected platform of choice.
How secure is Calendly?
Calendly is considered a secure tool, as it implements several security measures, including SSL encryption for data transfer, regular security audits, GDPR compliant options, SSO and SCIM for enterprise users, and privacy controls for calendar information.
Can I use Calendly for free?
Yes, Calendly offers a free plan that includes one active event type, unlimited one-on-one meetings, one connected calendar, basic email notifications, and standard integrations. For many individuals, the free plan provides sufficient functionality to improve their scheduling process.
How do I join a Calendly meeting?
To join a meeting scheduled through Calendly, find the meeting confirmation email or calendar invitation, click the meeting link or dial the provided phone number at the scheduled time. For video meetings, you'll be directed to the appropriate platform (Zoom, Teams, etc.). Finally, follow any additional instructions provided in the meeting details.
How do I cancel or reschedule a Calendly meeting?
Both you and invitees can cancel or reschedule meetings. You can manage changes from your dashboard, while invitees use the links in their confirmation emails to make adjustments.
Does Calendly work with Apple Calendar?
Calendly discontinued Apple Calendar integration for new users in 2024. Existing connections still work, but new users cannot connect iCloud calendars.
How do I set buffer time between meetings?
In your event type settings, add buffer time before and/or after meetings. This prevents back-to-back scheduling and gives you preparation time between appointments.
Can I limit how many meetings people can book with me?
Yes, set daily or weekly limits in your event settings to prevent calendar overload and maintain adequate time for other work.
How do I collect payment through Calendly?
Connect Stripe or PayPal in your integrations, then enable payment collection in your event type settings. Payment is required before booking confirmation.
What's the difference between Calendly's Group and Collective events?
Group events allow multiple invitees to book the same time slot (like webinars), while Collective events require multiple hosts to attend with one invitee.
How far in advance can people book meetings with me?
You control this in your event settings by setting date ranges. You can limit bookings to as short as one day or allow scheduling months in advance.
Can I use Calendly without showing my full calendar?
Yes, Calendly only shows your available time slots to invitees. Your actual calendar events and details remain private.
How do I add custom questions to my booking form?
In your event type settings, add invitee questions to gather information before meetings. You can make questions required or optional.
Does Calendly send automatic reminders?
Yes, set up automated email and SMS reminders in your workflows to reduce no-shows and keep everyone prepared for meetings.
Can I use Calendly on my phone?
Yes, Calendly offers mobile apps for iOS and Android, plus a browser extension for Chrome, Firefox, Edge, and Outlook.
Conclusion: Is Calendly right for you?
Calendly offers a powerful solution to the common challenge of scheduling meetings efficiently. By eliminating the back-and-forth emails typically required to find mutually available times, it can save you hours each week and create a more professional impression with clients, colleagues, and customers.
The platform's range of features—from basic one-on-one scheduling to advanced team coordination—makes it suitable for individuals and organizations of all sizes. The intuitive interface and extensive integration options allow Calendly to fit seamlessly into your existing workflow.
However, for users with specific needs around data privacy, Apple Calendar integration, or budget constraints, alternatives like Zeeg may be worth considering. As with any tool, the best choice depends on your particular requirements and priorities.
Whichever scheduling solution you choose, moving away from manual scheduling is a significant step toward greater productivity and professionalism in your work life.
Ready to get started? Explore Zeeg as an alternative option.


