

Looking to add scheduling capabilities to your website? Embedding Calendly on your website makes it easy for visitors to book appointments without leaving your site. Whether you need the Calendly embed code for WordPress, Squarespace, or Wix, this guide covers everything you need to know. And if you're searching for a more affordable, GDPR-compliant alternative, we'll also introduce you to Zeeg, which offers similar embedding options with full customization.
What is Calendly embed and why use it?

When you embed Calendly on your website, you create a seamless scheduling experience for your visitors. Rather than directing people away from your site to book an appointment, they can schedule directly from your web pages. This improves conversion rates by removing extra steps in the booking process. Also, it keeps visitors engaged with your content since they don't need to navigate to a different platform.
Using the Calendly embed code on your site creates a more professional appearance, with Calendly giving some embeding options. Whether you prefer to embed Calendly directly into your page content or create a pop-up calendar that appears when needed, there's an option that will work for your site.
Let's explore each method in detail to help you determine which calendly embed solution is right for your website.
👉 You might also like:
- Calendly QR code
- How to find, share and edit your Calendly link
- Calendly for Outlook plugin and add-in
- How to connect Calendly with Google Calendar
- Does Calendly work with Apple Calendar and iCloud?
- How to use Calendly buffer times
Types of Calendly embed options
There are three main ways to embed Calendly into your website:
1. Inline embed
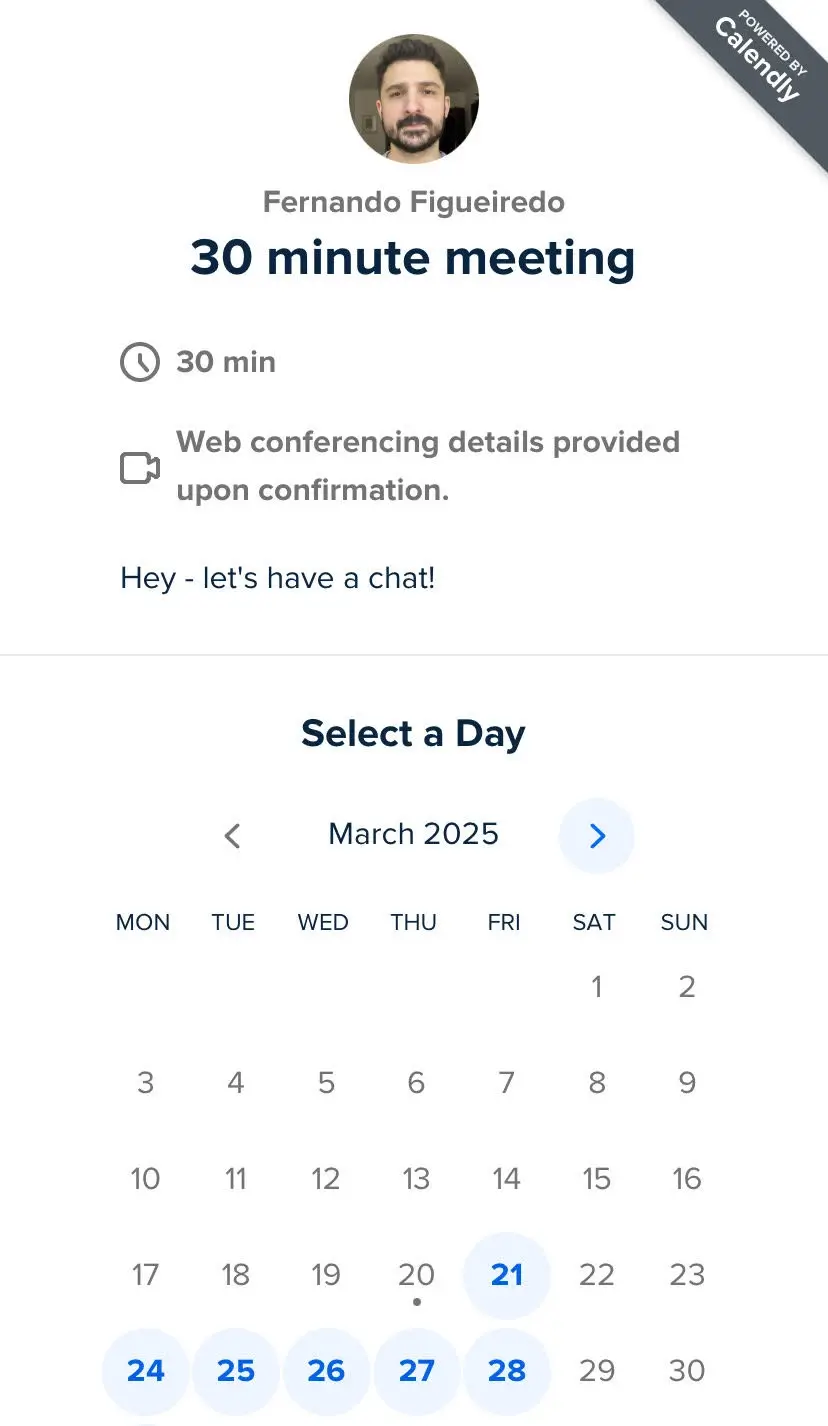
With inline embed, Calendly appears directly within your webpage content. This integration makes scheduling feel like a natural part of your site.
2. Pop-up widget
The pop-up widget adds a button (usually at the bottom of your page) that opens Calendly in a pop-up window when clicked. This option keeps your page clean while making scheduling accessible.
3. Pop-up text
Similar to the widget, but instead of a button, you can use text that, when clicked, opens the Calendly scheduler in a pop-up window.
Comparing different embed types
Each Calendly embed option has its own strengths and ideal use cases. Here's a comparison to help you choose the right one for your needs.
The inline embed works best when scheduling is the primary purpose of the page, such as on a dedicated "Book Now" page. The pop-up widget is ideal for making scheduling available across your entire site without taking up valuable content space. The pop-up text option works well within content where you want to naturally guide users to schedule at specific points in your narrative.
How to get Calendly embed code
Before adding Calendly to your website, you'll need to get the embed code. Here's how:
1. Sign in to your Calendly account
2. From your Home page, go to the Event Types tab
3. Find the event type you want to embed and click "Share"
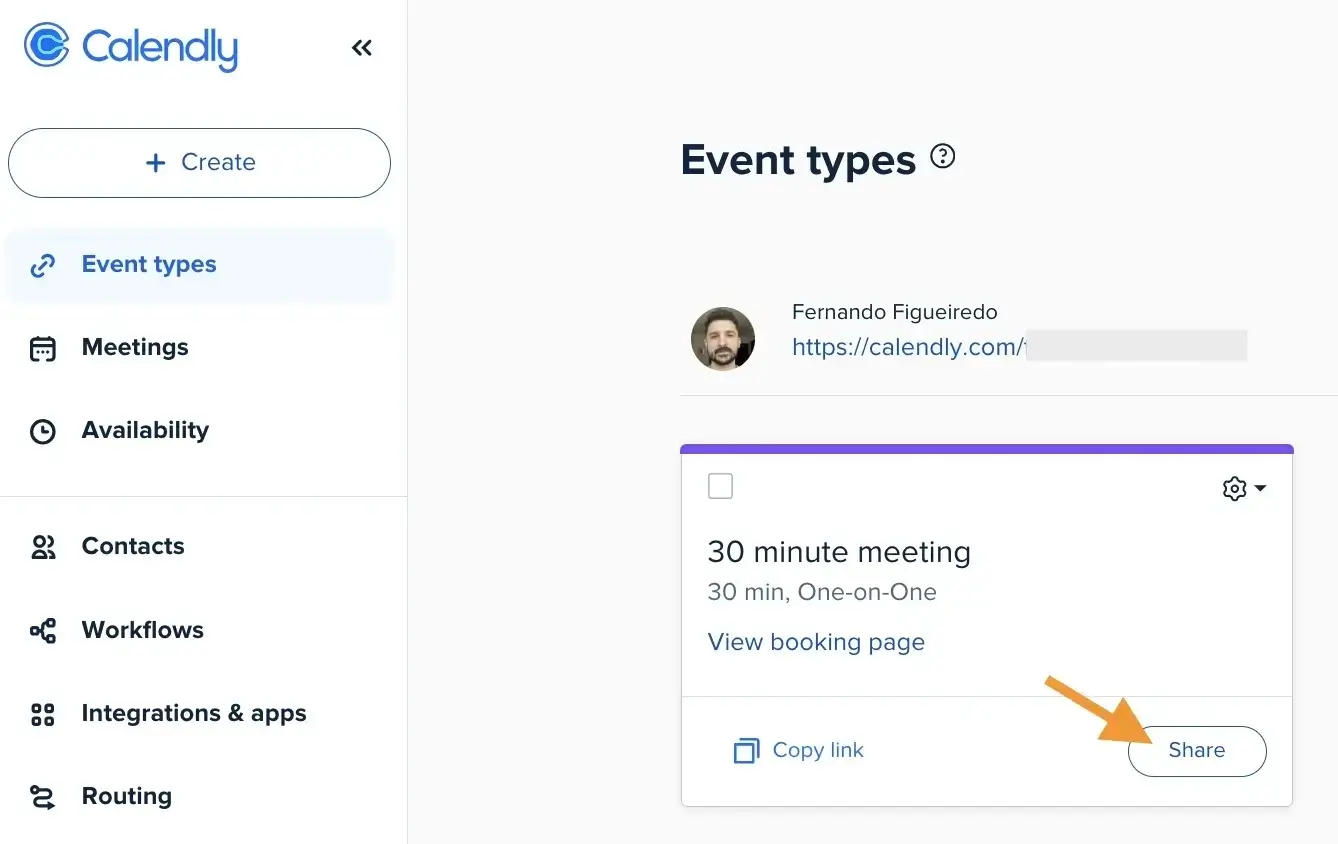
4. Select "Add to Website", choose your preferred method a hit "Continue"

7. Customize your settings if needed:
- To hide your profile picture, name, event duration, and description: Select "Hide Event Type Details"
- To hide the cookie banner: Select "Hide Cookie Banner"
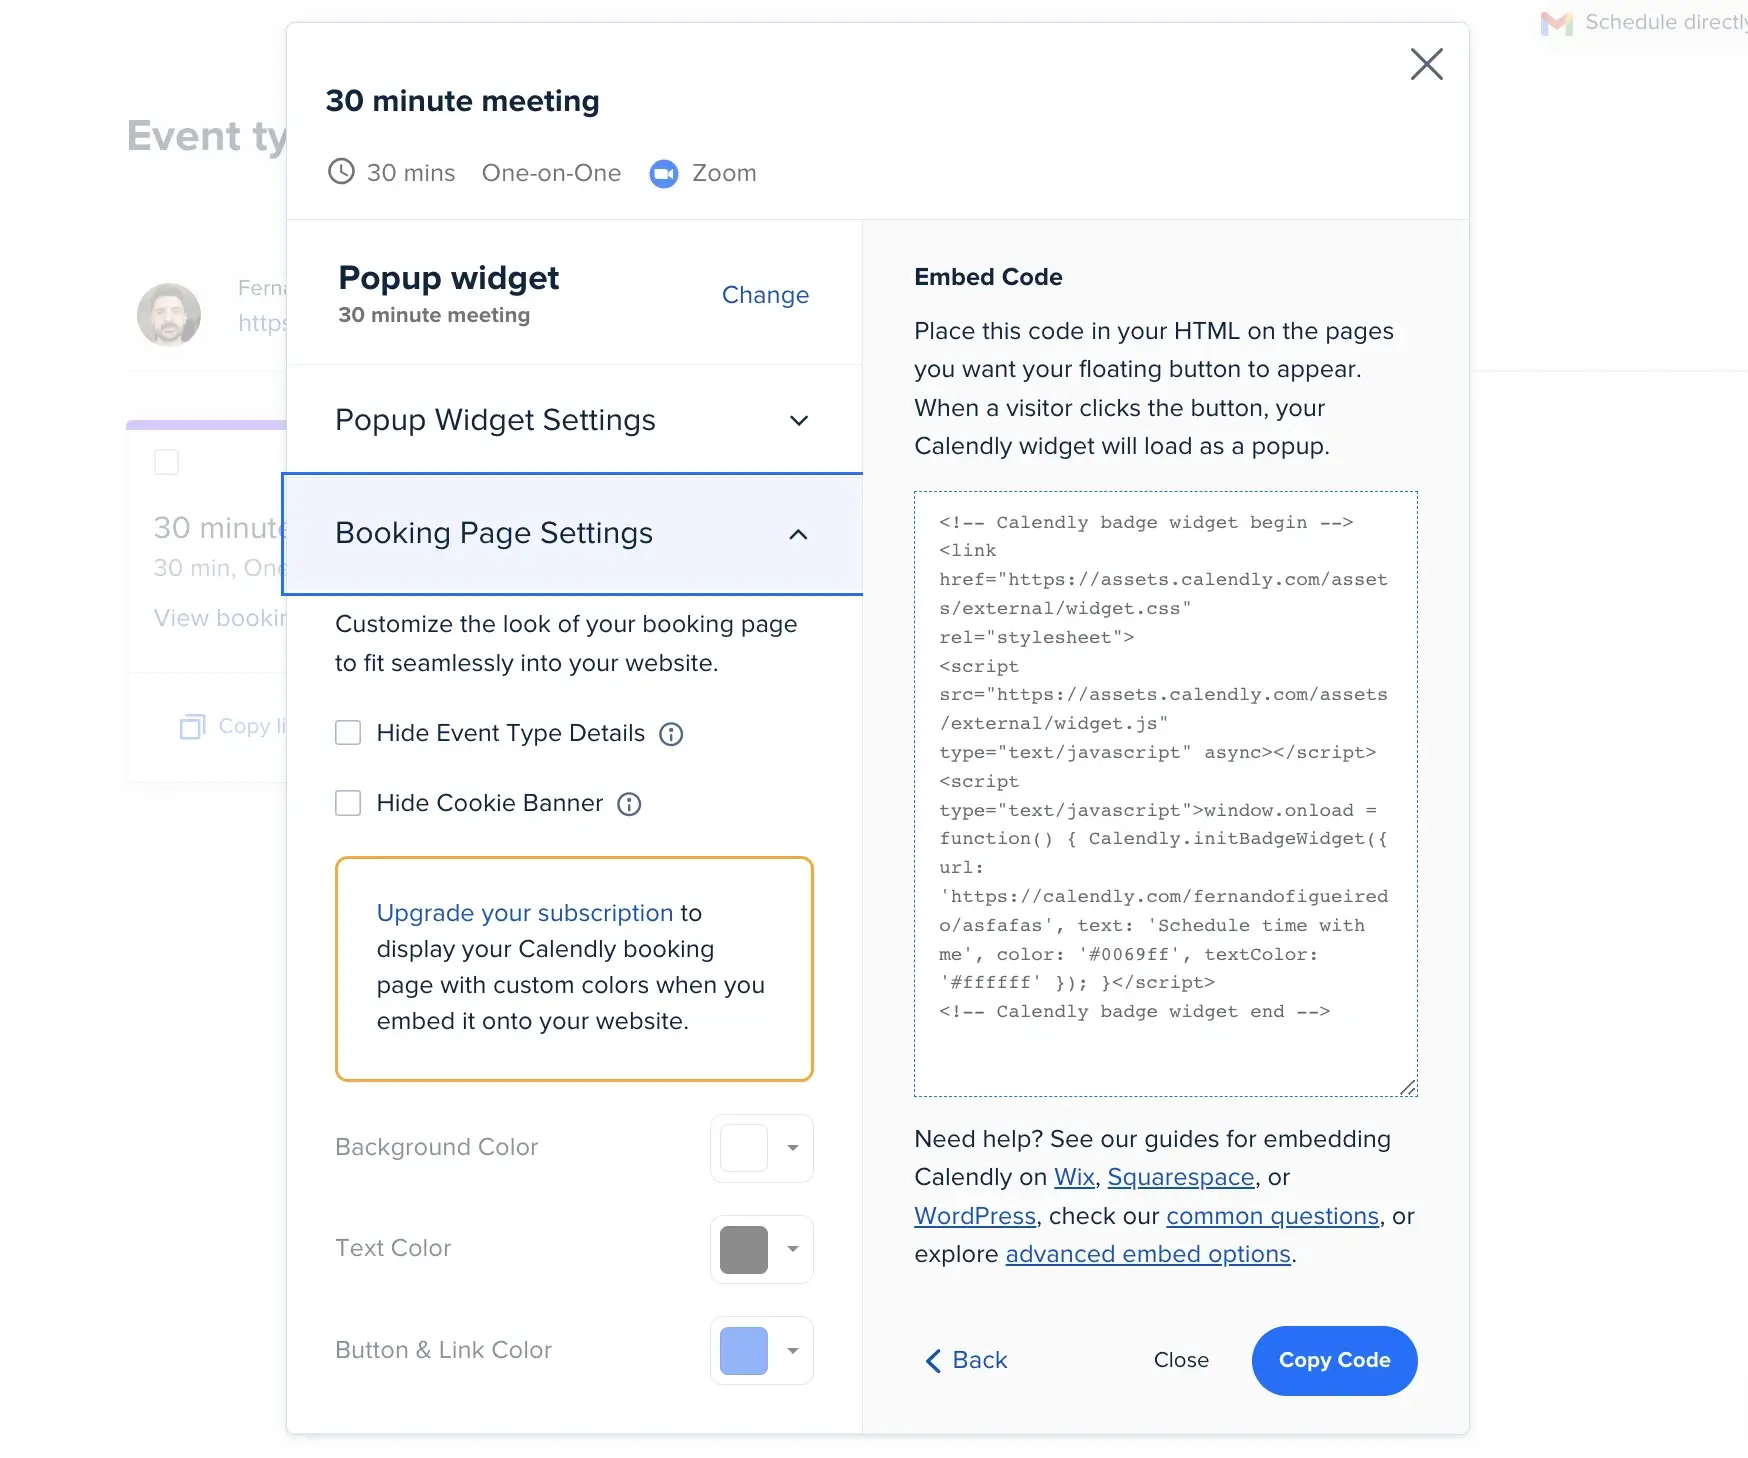
8. Click "Copy Code"
Now you have the code ready to add to your website. The exact placement depends on your website platform.
How to embed Calendly on WordPress
Here, you also have the option for other Wordpress booking plugins. But Calendly has a plugin too (and that's not the only way to embed on a Wordpress website):
Using the Calendly WordPress plugin
- Log in to your WordPress dashboard
- Go to Plugins > Add New
- Search for "Calendly"
- Install and activate the Calendly WordPress plugin
- Create a new page or edit an existing one
- Add a Calendly block or use the shortcode provided by the plugin
- Paste your Calendly link
- Update/publish your page
Using custom HTML
If you prefer not to use a plugin:
- Edit the page where you want to add Calendly
- Add a Custom HTML block
- Paste the Calendly embed code you copied earlier
- Update/publish your page
This method works well if you know how to embed Calendly into WordPress without using plugins.
How to embed Calendly on Squarespace
Squarespace users need a Business Plan or higher to embed Calendly:
- Sign in to Squarespace
- Navigate to the page you want to edit
- Hover over the page content and click "Edit"
- Add a code block (following Squarespace's "Add a code block" instructions)
- Paste your Calendly embed code
- Click "Apply"
If your embed doesn't display properly, try these steps:
- Go to "Settings"
- Select "Advanced"
- Under "Code injection," paste this code in the header section:
- Click "Save"
The Calendly Squarespace integration provides a clean, professional look when done correctly.
How to embed Calendly on Wix
Wix supports both inline embeds and pop-up widgets:
For inline embed:
- Sign in to Wix
- Click "Edit Site"
- Click the "+" button and select "Embed & Social"
- Choose "Embed Code"
- Click "Enter Code" and paste your Calendly iframe code
- Click "Update"
- Adjust the size and position of the widget
- Publish your site
For pop-up widget:
- Follow the same steps, but use the pop-up widget code
- Note that you need a paid Wix plan, a published site, and a connected domain
Adding Calendly to your Wix website creates a professional scheduling experience for your visitors.
Mobile optimization for Calendly embeds
Ensuring your Calendly embeds work well on mobile devices is crucial for providing a good user experience to all visitors. Here are some best practices for mobile optimization:
For inline embeds:
- Adjust the height for mobile: Mobile screens have limited vertical space. Consider using a shorter height value for mobile devices:
- Set appropriate width: Always include the
min-widthparameter in your embed code, but make sure your container is responsive:
- Consider using pop-up options: On mobile, the pop-up widget or pop-up text options often provide a better experience than inline embeds since they don't take up precious screen space until activated.
For pop-up widgets:
- Position appropriately: Ensure your widget button doesn't obstruct important mobile content or interfere with navigation menus.
- Make buttons touch-friendly: If creating a custom button, ensure it's large enough (at least 44x44 pixels) for easy tapping on mobile screens.
- Test on actual devices: Always test your Calendly embeds on real mobile devices to ensure they function properly across different screen sizes.
The pop-up widget is generally the most mobile-friendly option as it requires minimal screen space while still providing easy access to scheduling functionality.
Calendly embed customization options
For a more tailored look that matches your brand identity, Calendly has some customization options for the appearance of your embeds. They're not the greatest, as the final looks are always quite similar, but you can still get it closer to your business appearance. That's good especially for widgets, as they can complement your site's color palette and transition well between your content and the booking interface.
Additionally, you can adjust the text color to ensure perfect readability while maintaining your brand's visual language. The button and link colors can also be customized to match your website's accent colors, creating a cohesive user experience. When setting up your embed, all these options can be configured before copying the code, which can help you with the implementation process. The Submit or Schedule Event button text color will automatically adjust to either black or white, depending on your selected button color, ensuring accessibility and readability.
For example, you might use these custom color settings:
- Background color: #F5F5F5 (off-white)
- Text color: #333333 (dark gray)
- Button & link color: #8BC34A (leaf green)
These customization options are particularly valuable for creating a cohesive brand experience throughout your website, reinforcing your visual identity even within functional elements like scheduling tools.
Change widget positioning
By default, the pop-up widget appears in the bottom right corner of your page. To change this:
Left alignment:
Center alignment:
Create a custom Calendly button
To create your own button that triggers the Calendly pop-up:
- Add this code to your page:
- Add this onclick attribute to your button or link:
- Replace YOUR_SCHEDULING_ LINK with your actual Calendly link
Remove scroll bars
If your embed shows unwanted scroll bars:
- Find the height parameter in your embed code
- Increase it to accommodate your entire calendar
Hide event details
Remove your profile picture, event duration, and other details by adding this parameter to your URL:
For event type-specific links:
For profile or team page links:
Hide the cookie banner
Add this parameter to your Calendly link:
The final code will look something like:
Handling multiple Calendly embeds on one page
If you need to include multiple Calendly embeds on a single page, there are a few important considerations to keep in mind:
For multiple inline embeds:
- Unique identifiers: Each embed needs a unique identifier. When using the advanced JavaScript method, ensure each has a different parent element ID:
- Auto-resize limitations: Calendly only supports auto-resizing for one embed per page. As noted in the documentation: "Only one embed per page can be automatically resized. Using more than one will resize both based on the most recently changed page, and will scroll to the top of the first embed."
- Performance considerations: Multiple embeds can impact page load performance. Consider using pop-up options instead of multiple inline embeds to improve page speed.
For multiple pop-up options:
- You can have multiple pop-up text links or custom buttons on a single page without issues.
- Each can point to different event types:
- For the pop-up widget (floating button), you should generally use only one per page to avoid cluttering your interface.
By carefully planning your implementation, you can effectively use multiple Calendly scheduling options on a single page without conflicts or performance issues.
Developer options for Calendly HTML embed
For developers looking for more control, Calendly offers advanced integration options:
Using JavaScript API calls
Create an inline embed on demand:
- Create a div with a specific ID
- Include the Calendly JavaScript file:
- Use this API call:
Automatic resizing
Make your embed resize automatically:
Or with JavaScript:
Note: Only one embed per page can use automatic resizing.
Pre-filling invitee information
If you've collected visitor information, pre-populate it in the booking form:
Parent window notifications
Track booking events:
This lets you track events like when appointments are scheduled or specific pages are viewed.
Embedding Calendly on other platforms
Beyond WordPress, Squarespace, and Wix, Calendly can be embedded on many other platforms:
Unbounce
- Sign in to Unbounce
- Edit your page
- Drag "Custom HTML" onto the page
- Paste your Calendly embed code
- Save and preview
Webflow
- Get your Calendly link or embed code
- In Webflow, add an Embed element
- Paste your code and click "Save & Close"
- For pop-up options, add the code to page settings
Google Sites
- Edit your Google Sites page
- Insert an Embed element
- Paste your Calendly embed code
- Save your changes
Zeeg: A fully customizable alternative to Calendly

While Calendly is a popular scheduling tool, Zeeg offers a compelling alternative with greater customization options and several key advantages. At the heart of Zeeg's appeal is its fully customizable booking page that seamlessly integrates with your brand identity. Unlike more restrictive options, Zeeg gives you complete control over your scheduling page's appearance, allowing you to create a consistent brand experience from your website through to your booking process.
With Zeeg, you can customize colors, fonts, and layout elements to perfectly match your website's design language. This level of personalization ensures visitors feel they're still interacting with your brand even during the scheduling process. The booking page can be embedded on your website using similar methods to Calendly - inline, as a pop-up widget, or through text links - while maintaining your unique visual identity.
Beyond customization, Zeeg offers several distinct advantages:
- Full iCloud Calendar integration: Unlike Calendly, which no longer offers iCloud Calendar integration for new users, Zeeg provides complete Apple Calendar compatibility
- GDPR compliance: Built in Europe with end-to-end encryption, Zeeg ensures your scheduling data meets strict privacy standards
- Advanced scheduling features: Smart routing with intake forms, automated workflows, and team scheduling tools give you powerful capabilities without the premium price tag
- Meeting analytics: Track your scheduling patterns and improve your availability management with built-in analytics
Embedding Zeeg on your website follows a similar process to Calendly, making it easy to switch if you're looking for a more customizable, privacy-focused, and cost-effective solution. The familiar implementation means you don't need to learn entirely new systems to upgrade your scheduling experience.
For businesses concerned about maintaining brand consistency throughout the customer journey, Zeeg's customization options provide the flexibility needed to create a truly seamless experience. Combined with its privacy-focused approach and competitive pricing, Zeeg represents a compelling alternative to Calendly for website embedding.
Troubleshooting common Calendly embed issues
If you're experiencing problems with your Calendly embed, here are some solutions to common issues:
Calendly not showing up
Is your Calendly embed missing from your website? Check a few simple things first. Make sure you've pasted the entire Calendly embed code correctly – even small HTML errors can prevent it from showing up. Next, check if your website platform allows you to add custom code or embed external content. Many website builders have different permission levels for this. Also make sure JavaScript is turned on in your browser and website settings, as Calendly needs this to work properly. Try viewing your page in different browsers to see if the problem is with a specific browser or with the embed itself.
Scrolling issues
Having trouble with scrollbars in your Calendly embed? The most common fix is adjusting the height in your embed code. If your calendar looks cut off or shows an extra scrollbar inside the embed, try increasing the height value to fit everything. Some event types with longer descriptions need more space than the default settings provide. Another helpful option is adding the data-resize="true" attribute to your Calendly iframe code. This lets the embed automatically adjust its height based on what's being displayed, giving visitors a cleaner view of your calendar without awkward scrolling.
Mobile display problems
Making your Calendly embed work well on mobile devices is essential for a good user experience. Place your embed in a responsive container that adjusts to different screen sizes rather than using fixed widths that might break on phones. Set an appropriate minimum width (Calendly recommends at least 320px) but test on various devices to find what works best for your site. Remember that mobile screens are limited, so you might want to use the Calendly pop-up widget or pop-up text options instead of the inline embed on mobile-focused pages.


