

Apple Calendar (formerly known as iCal) is one of the most powerful scheduling tools available on your Mac, iPhone, iPad, and Apple Watch. While it might appear simpler than some alternatives like Microsoft Outlook, this app offers a lot that most people can use to organize their personal and professional lives effectively. But not everyone will know that well.
In this guide, we'll explore how to use Apple Calendar to its full potential. We'll cover everything from setting up your preferences and creating multiple calendars to advanced features like travel time notifications and time zone management. You’ll also see how Zeeg can make it a very efficient way to have your meeting scheduling automated. By the end, you'll know how to use 12 essential techniques to transform Apple Calendar into a productivity tool.
Getting started with Apple Calendar
Before diving into specific tips, let's ensure your Apple Calendar is properly set up with the right preferences. This foundation will make all other features more effective.
👉 You can also read more about Apple Calendar on:
- How to share Apple Calendar
- How to connect Notion Calendar to Apple Calendar
- Apple Calendar vs Google Calendar
- How to sync Google Calendar with Apple Calendar
- Does Calendly work with Apple Calendar?
How to find Apple Calendar

Apple Calendar is easy to locate on your Mac—it's likely already in your dock at the bottom of your screen, represented by a calendar icon showing the current date. If you don't see it there:
- Look in your Applications folder
- Search for "Calendar" using Spotlight (press ⌘+Space)
- Check your Launchpad
On iPhone or iPad, the Calendar app comes pre-installed and appears on your home screen with a similar calendar icon.
Setting up your preferences
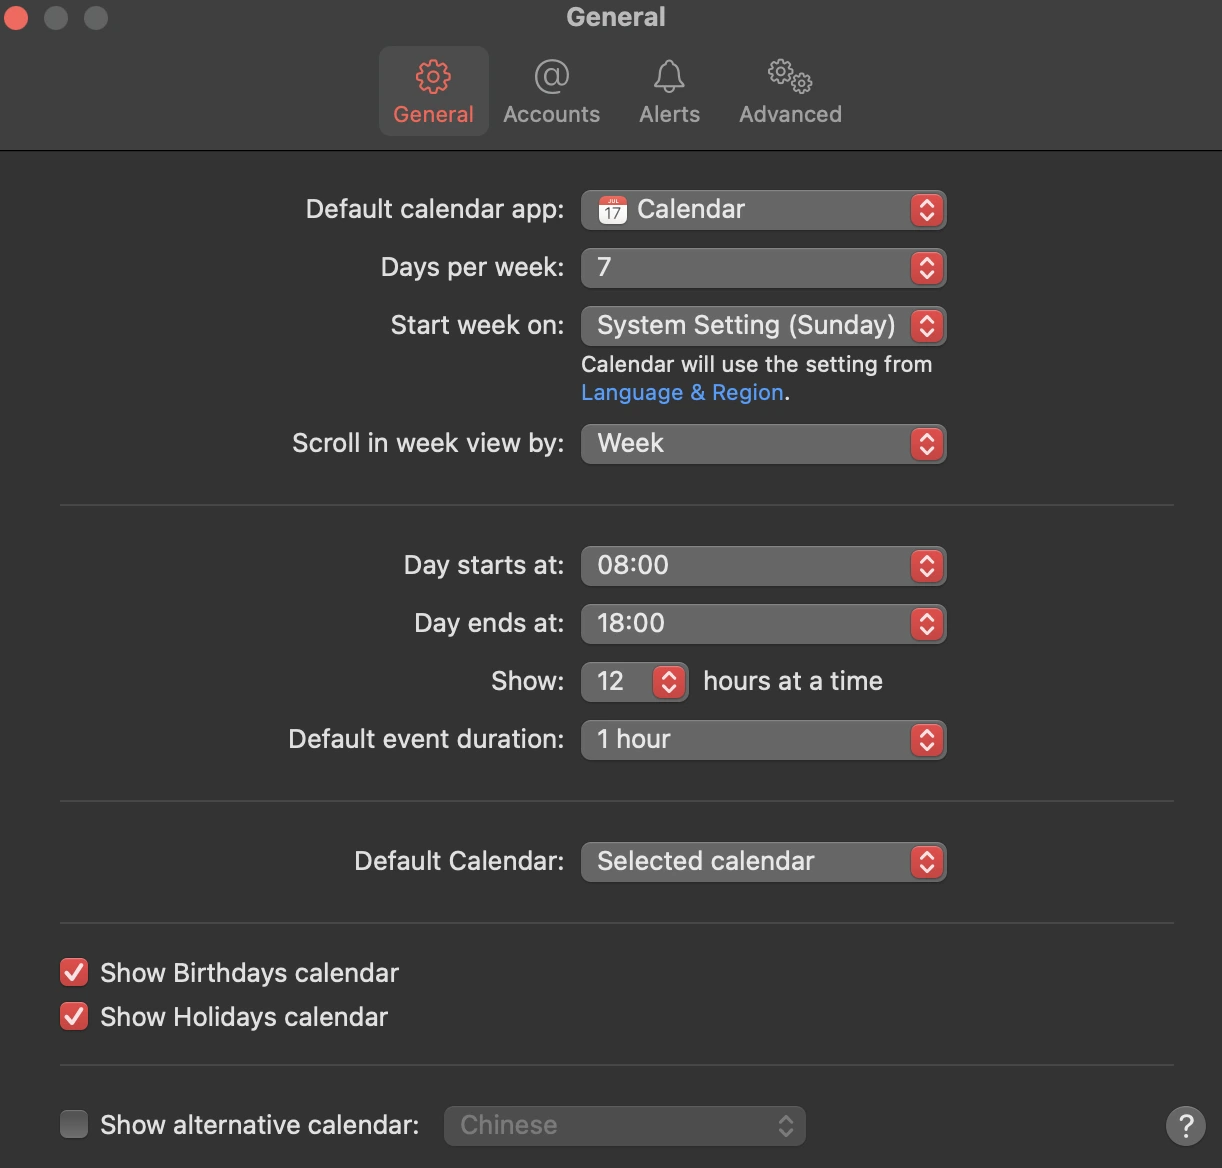
When you first open Apple Calendar on your Mac, you'll want to customize it to match what you actually need:
- Click on Calendar in the menu bar, then select Settings/Preferences
- In the General tab, you can:
- Set your default calendar
- Choose how many days to show in week view
- Select which day your week starts on
- Define when your day begins and ends
- In the Alerts tab, configure default notification times for:
- Regular events
- All-day events
- Birthdays
- In the Advanced tab, you can:
- Enable time zone support
- Show week numbers
- Choose whether to open events in separate windows
- Set CalDAV invitations to automatically retrieve from Mail
These settings create the framework for how your calendar will function, so taking a few minutes to configure them properly will save you time later.
How to use Apple Calendar: 12 best tips
- Create an organize multiple events
- Connect and sync with the best calendar services
- Share and delegate calendars with others
- Create events with natural language
- Use travel time and location
- Set up custom alerts and automated actions
- Master calendar views
- Manage calendar visibility
- Connect with Zeeg to automate meeting scheduling
- Book your events with Siri
- Access your calendar anywhere with iCloud
- Use time zone management
Now that you've got the basics configured, let's explore the most powerful ways to use Apple Calendar effectively.
1. Create and organize multiple calendars
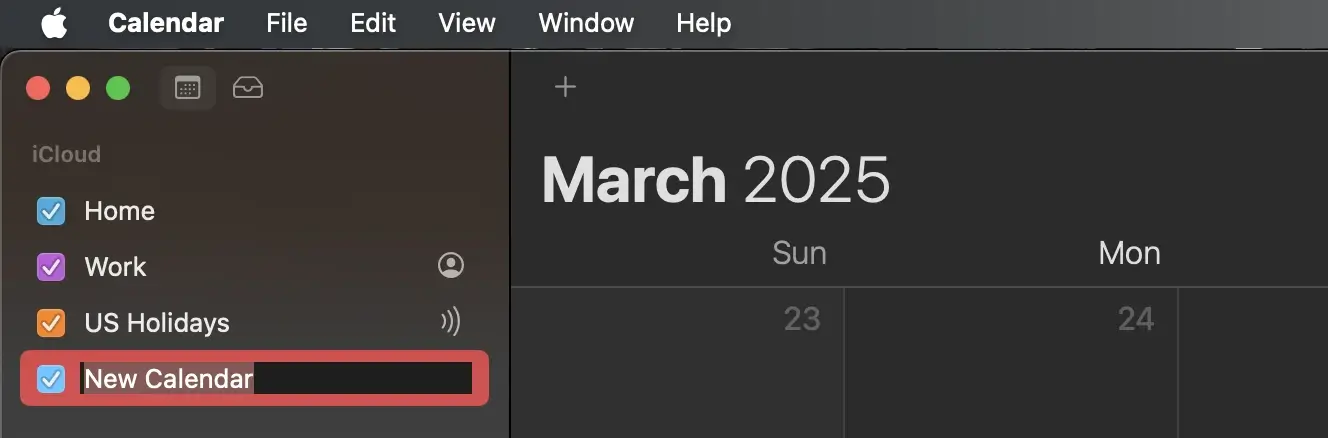
One of Apple Calendar's most valuable features is the ability to create separate calendars for different areas of your life. This approach helps maintain boundaries and keeps your schedule organized:
- Create separate calendars for work, personal, and family events
- Use different colors for each calendar for easy visual distinction
- Set up dedicated calendars for special projects, sports teams, or hobbies
To create a new calendar on Mac:
- Select File > New Calendar
- Choose where to store it (On My Mac or in your iCloud account)
- Name it appropriately
- Click the colored dot next to the calendar name to assign a color
On iPhone or iPad:
- Tap Calendars at the bottom of the screen
- Tap Add Calendar
- Enter a name and choose a color
This organization system lets you control which calendars are visible at any time and which ones you share with others, helping you manage your work-life balance more effectively.
2. Connect and sync with other calendar services
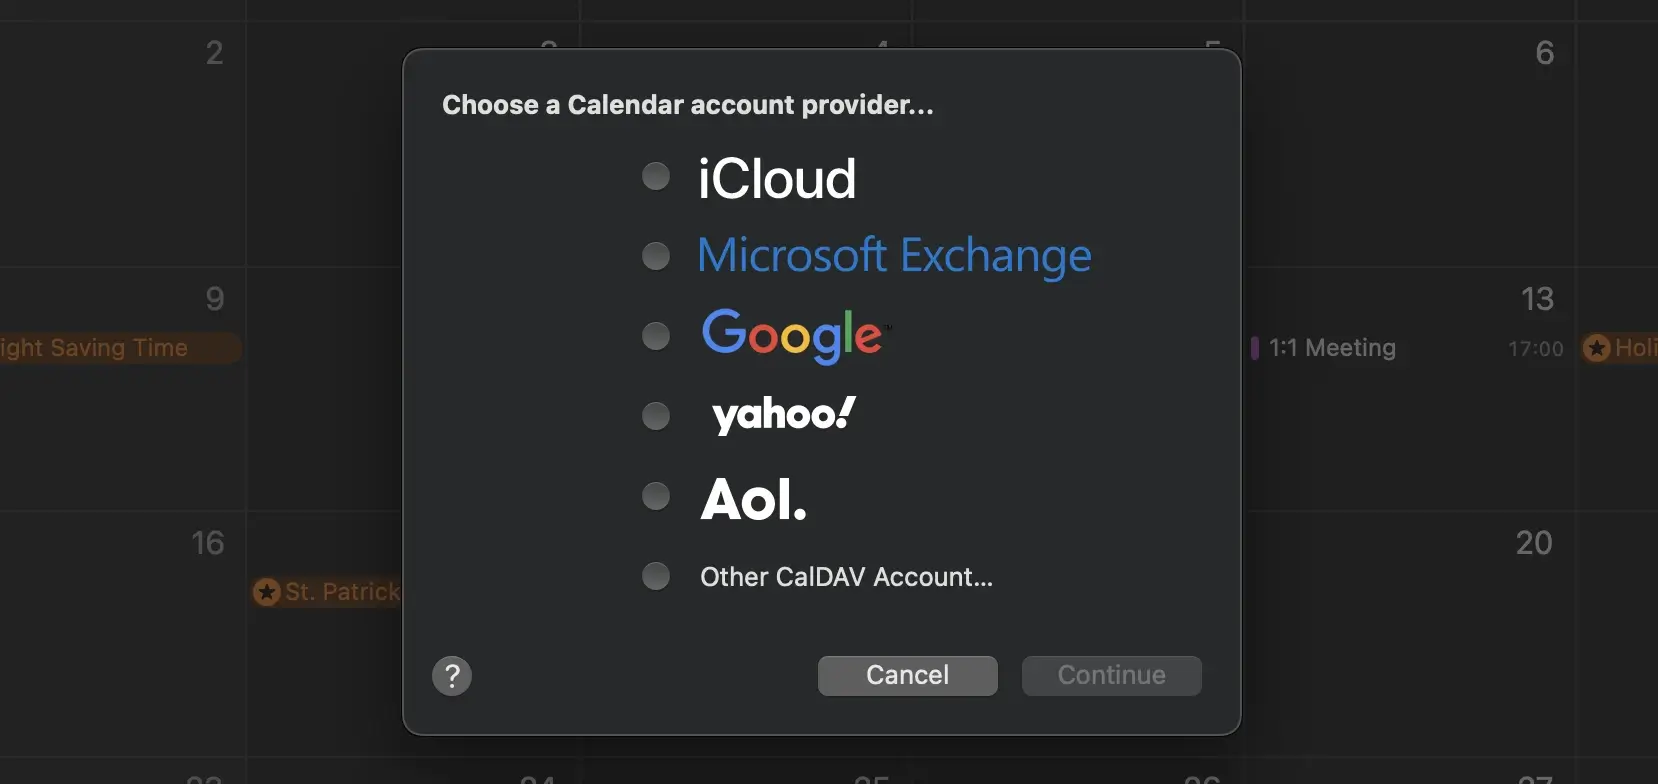
Apple Calendar works well on its own, but it also functions as a calendar client, displaying events from other services like Google Calendar, Microsoft Exchange, or Yahoo. This creates a unified view of all your appointments. If you want to sync Apple Calendar with Google Calendar, for example, follow these steps:
To connect external calendars:
- On Mac: Go to Calendar > Accounts and click the "+" button
- On iPhone/iPad: Go to Settings > Calendar > Accounts > Add Account
When adding a Google Calendar:
- Choose Google from the list of account providers
- Enter your Google email address and password
- Select which Google services to sync (ensure "Calendars" is checked)
- Click "Done" to complete the setup
By default, Apple Calendar syncs every 15 minutes. To change this frequency:
- On Mac, go to Calendar > Preferences > Accounts
- Select your account
- Click the "Refresh Calendars" dropdown
- Choose your preferred sync interval
Having all your events in one place eliminates the need to check multiple calendar apps and reduces the risk of double-booking.
You can also import calendars from other sources by choosing File > Import. Apple Calendar supports importing .ics files and other standard calendar formats.
There's also a better way to do this. If you use Zeeg, not only you get all your calendars synced, with no double-bookings, but you also let your friends, colleagues or prospects book the meetings according to your availablity 24/7, and your calendars will all get updated.
3. Share and delegate calendars with others
Collaboration is essential for family coordination and team productivity. Apple Calendar offers several ways to share your schedule:
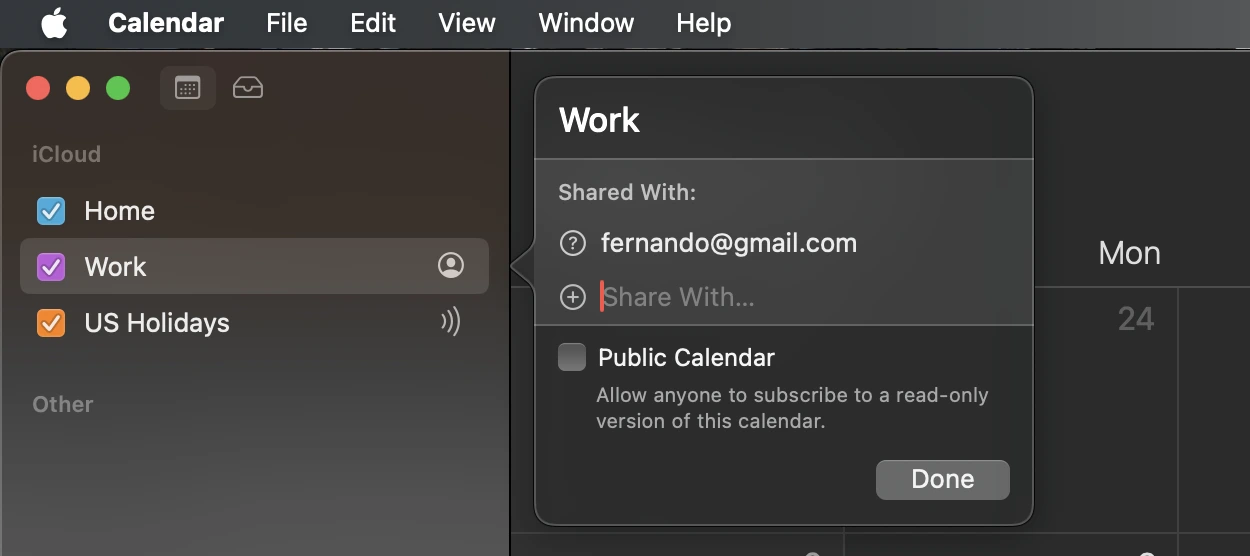
For personal sharing:
- Click on the icon next to a calendar's name
- Enter the email addresses of the people you want to share with
- Choose whether they can make changes (edit) or only view your calendar
For public viewing:
- Check the "Public Calendar" box in the sharing options
- Share the generated URL (use with caution, as anyone with the link can see your events)
For business delegation (primarily with Exchange accounts):
- Go to Calendar > Preferences > Accounts
- Select your account and click "Delegation"
- Add the people who should have access to manage your calendar
For family coordination, consider setting up a dedicated family calendar:
- Create a new calendar named "Family"
- Share it with edit permissions for all family members
- Use it for events everyone needs to know about: vacations, doctor appointments, school events
- Consider using distinct colors for each family member's personal events
This feature is particularly useful for family schedules, team coordination, or assistants managing executive calendars. The ability to selectively share specific calendars while keeping others private helps maintain appropriate boundaries between different parts of your life.
4. Create events using natural language and quick entry

Apple Calendar understands natural language, making event creation faster and more intuitive:
- Click the "+" button in the toolbar
- Type a phrase like "Lunch with Sarah at Cafe Milano tomorrow at noon" or "Doctor appointment next Tuesday at 2pm"
- Apple Calendar will automatically interpret this and create a properly scheduled event
For even more detailed events, after the quick creation:
- Click on the new event to edit it
- Add a location, which often automatically adds a map
- Invite attendees by typing their names or email addresses
- Add notes, URL links, or file attachments as needed
This natural language processing makes adding events feel conversational rather than technical, saving you valuable time.
5. Use travel time and location-based features
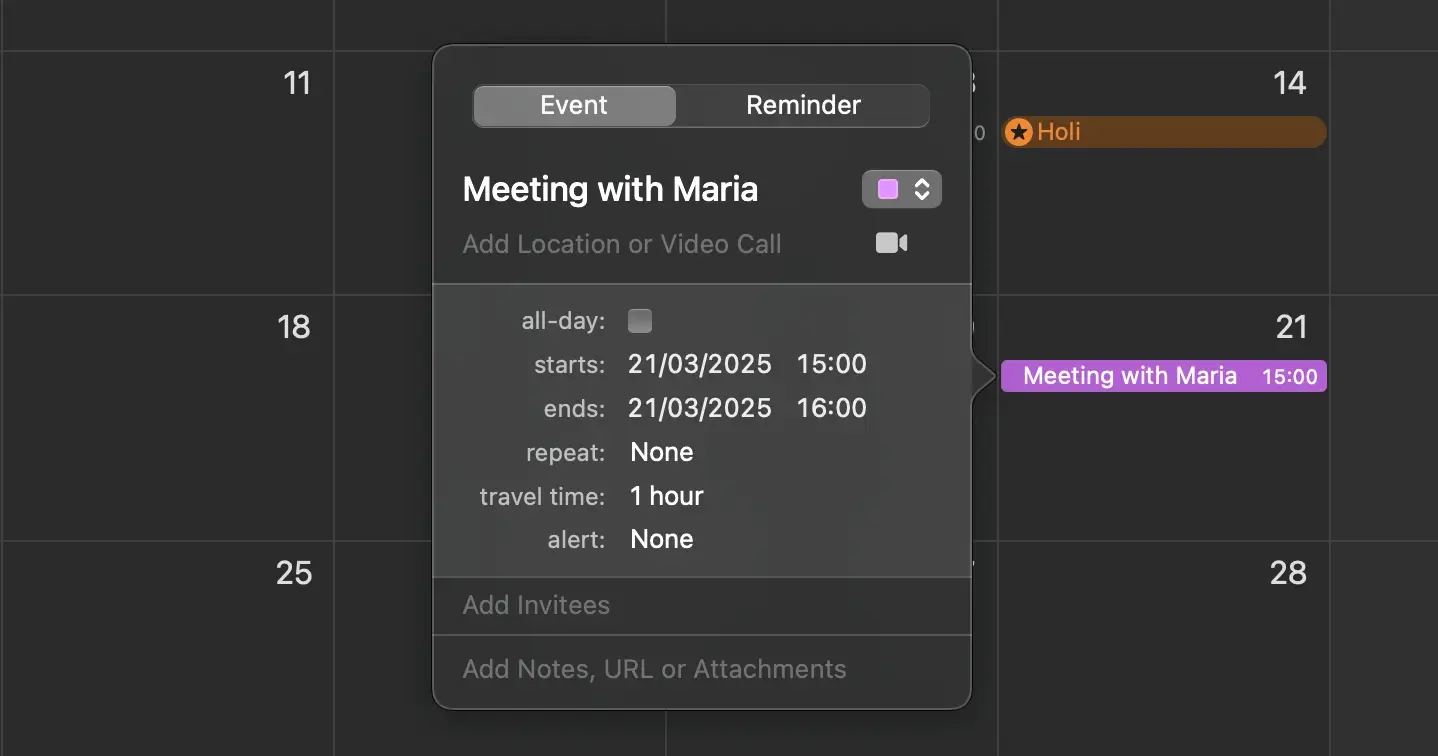
One of Apple Calendar's most helpful features is its ability to account for travel time and provide location awareness:
- When creating an event, add a specific address in the location field
- Click "Travel Time" and select how long you'll need to get there
- Choose your transportation method (driving, public transit, walking)
- Apple Calendar will block off this time in your schedule and notify you when it's time to leave
The app can even estimate travel time based on:
- Current traffic conditions
- Your location before the appointment
- Weather and other factors that might impact travel
This feature helps prevent the stress of running late by ensuring you have adequate time to reach your destination.
6. Set up custom alerts and automated actions
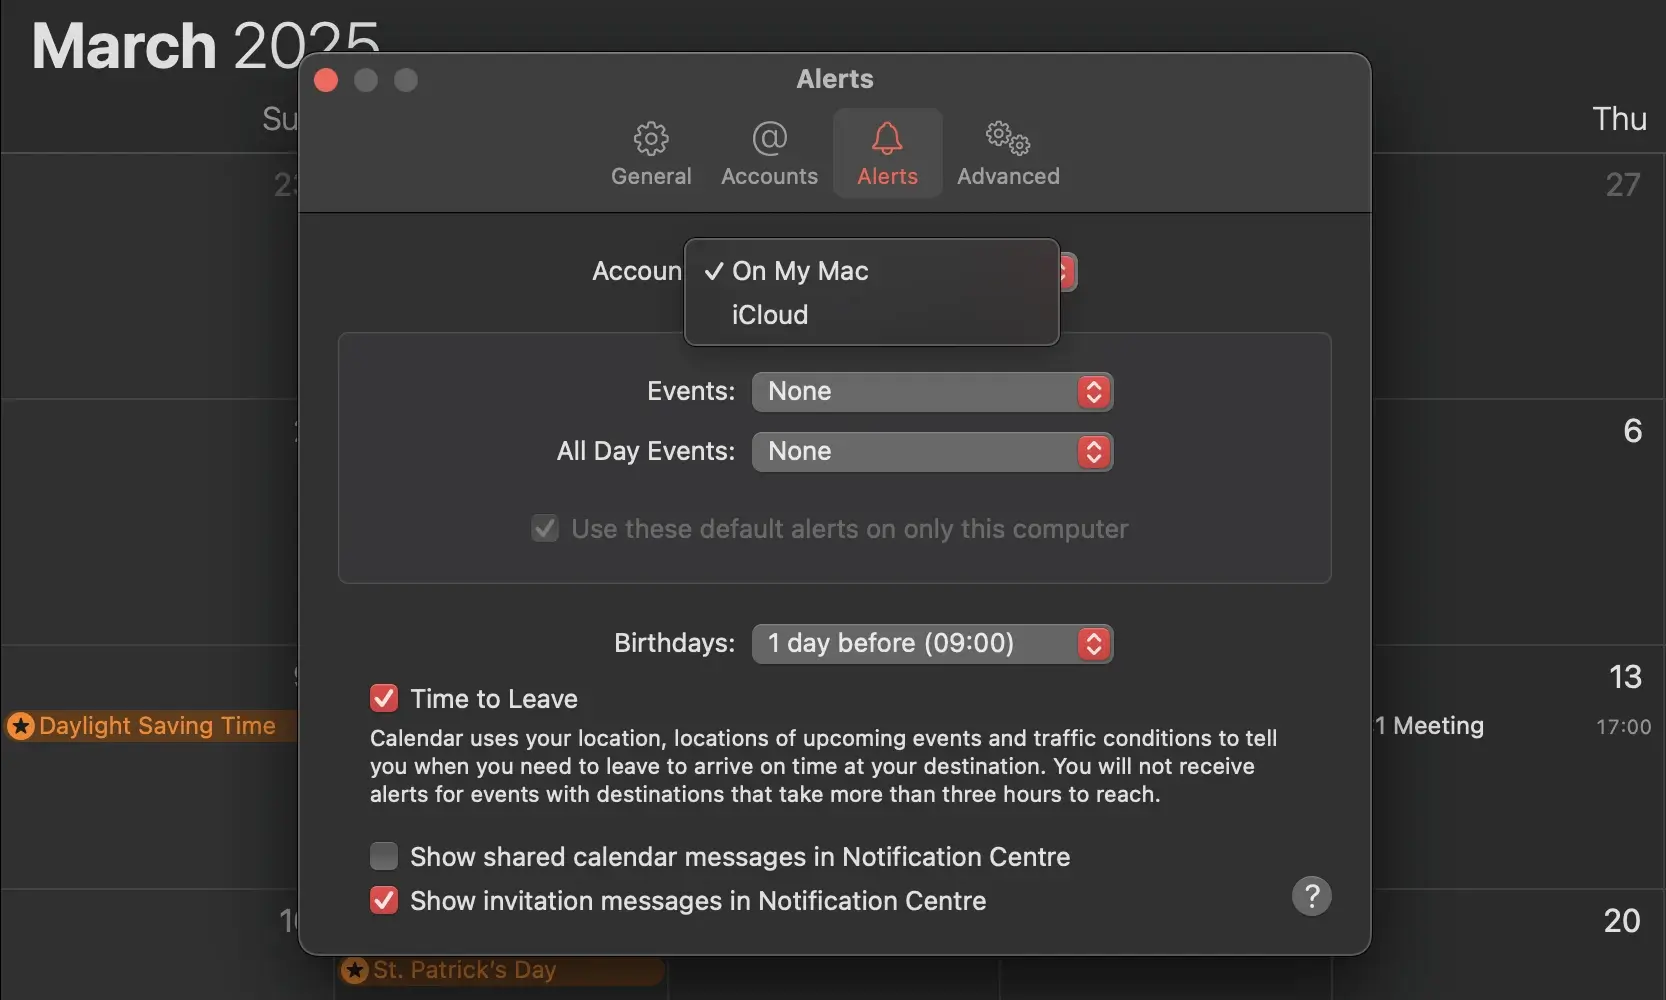
Never miss an important event by configuring intelligent notifications:
Standard alerts:
- Configure default notification times in Preferences > Alerts
- Set different alert types for various event categories
- Create multiple alerts for critical events (e.g., 1 day before, 1 hour before, 15 minutes before)
Advanced action triggers:
- When editing an event, click "Add Alert"
- Choose "Custom..."
- Select an action like "Open File" or "Send Email"
- For file opening, select a relevant document you need for the meeting
This automation can prepare you for meetings by opening agenda documents, presentation files, or reports at designated times before your event begins.
7. Master calendar views for different planning needs
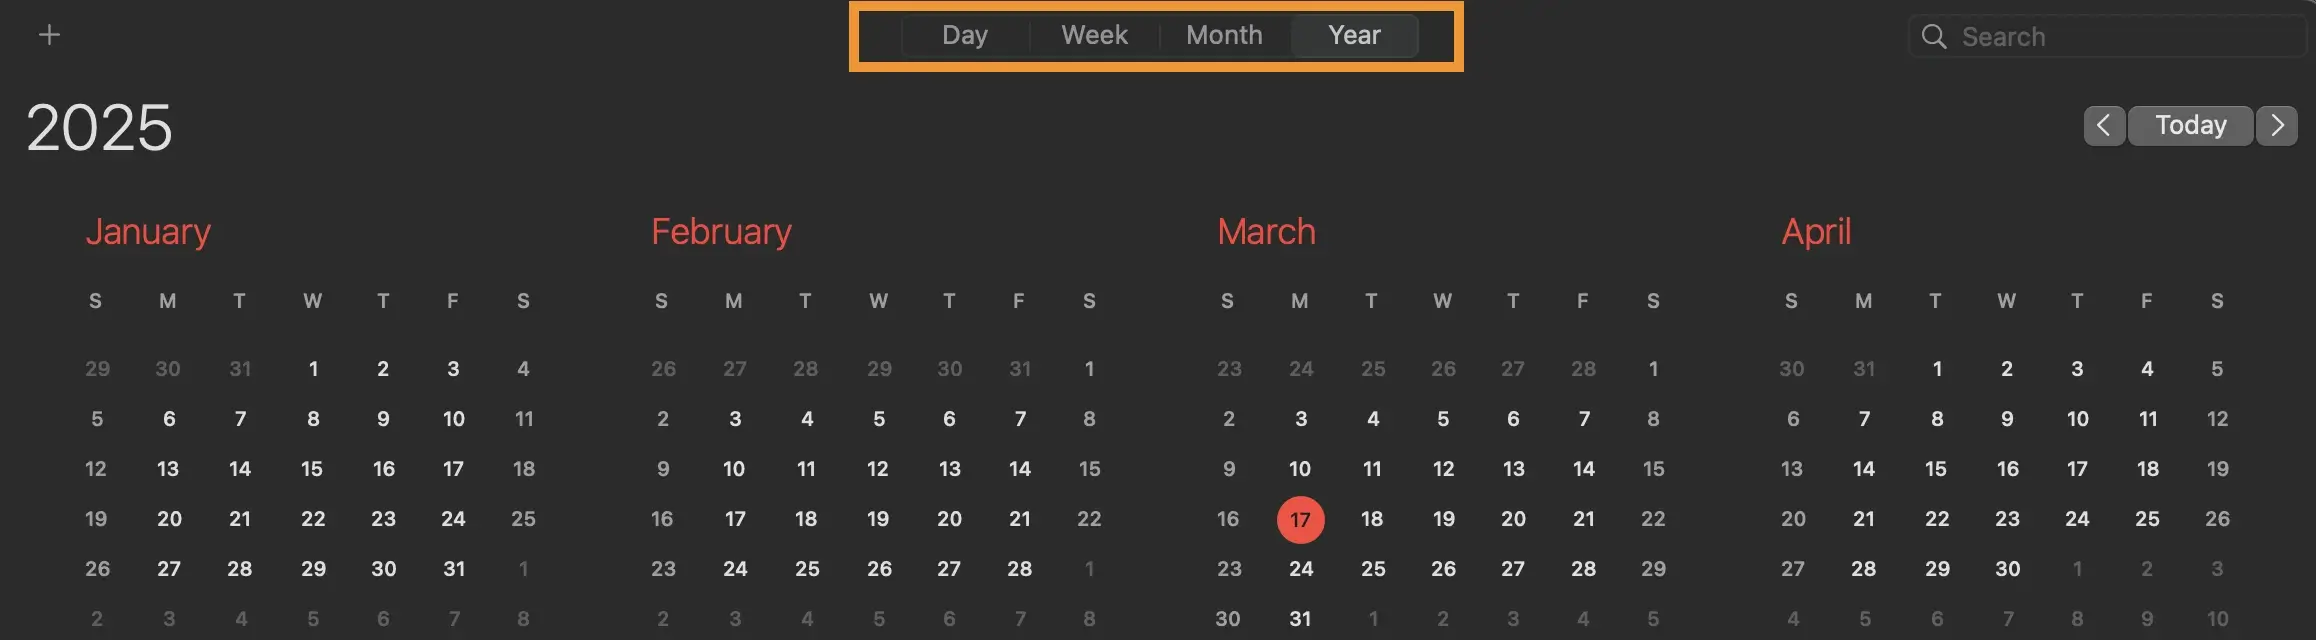
Apple Calendar offers multiple perspectives on your schedule, each serving different planning purposes:
- Day view: Provides an hourly breakdown with detailed event information
- Week view: Shows your entire week at a glance for medium-term planning
- Month view: Gives you a broader perspective for long-term planning
- Year view: Offers an overview of busy periods and major events throughout the year
To quickly switch between views:
- Use the view selector buttons at the top of the calendar
- Use keyboard shortcuts: ⌘+1 for day, ⌘+2 for week, ⌘+3 for month, and ⌘+4 for year (on Mac)
- Pinch to zoom on touchscreen devices
When using Year view, you can see scheduled events by clicking on any date—a small popover will appear showing that day's events. This makes Year view more useful than it might initially appear, as you can quickly scan through dates without leaving the annual perspective.
In Month view, you can hover over truncated event names to see their full details in a tooltip, making it easier to identify events when your calendar is crowded.
Experiment with different views for various planning tasks. Day view works well for focused daily execution, while month view is better for strategic planning.
8. Manage calendar visibility for clarity
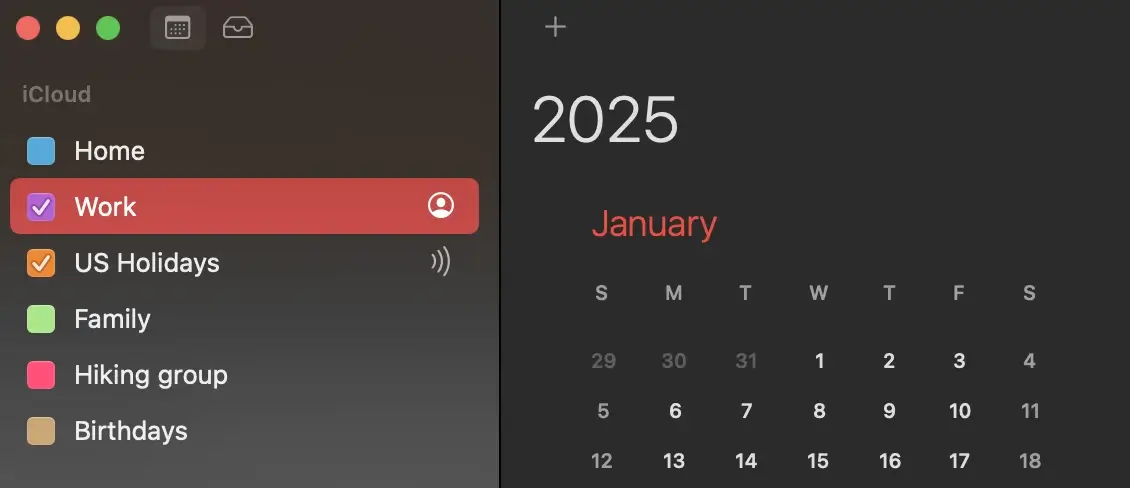
As your collection of calendars grows, your display can become cluttered. Apple Calendar lets you control which calendars are visible:
- Click the checkbox next to a calendar's name to show or hide it
- Use View > Show/Hide All-Day Events to control visibility of all-day events
- Create calendar groups to show or hide multiple calendars at once
On Mac, you can also:
- Go to View > Show Calendar List to see all your calendars
- Check or uncheck calendars as needed
- Right-click on calendars to access additional options
For holidays and special events, you can subscribe to pre-made calendars:
- Choose File > New Calendar Subscription
- Enter the calendar's URL (you can find these online for national holidays, sports teams, etc.)
- Configure refresh frequency and alert options
- Give the calendar a name and color
This lets you add important dates without manual entry, and you can hide these calendars when not needed. The selective visibility allows you to focus on what's relevant right now while maintaining your schedule in the background.
9. Connect Apple Calendar with Zeeg for professional scheduling

While Apple Calendar excels at personal organization, integrating it with Zeeg takes your scheduling capabilities to a professional level. Zeeg is a GDPR-compliant scheduling platform that works seamlessly with Apple Calendar.
With this integration:
- Your can merge your calendars from different calendar apps in one single place
- Create a customized booking page that reflects your brand
- Allow others to schedule appointments based on your actual availability
- Automate confirmation emails and reminders
- Set buffer times between meetings
- Collect payments for appointments if needed
To connect Apple Calendar with Zeeg:
- Sign up for a Zeeg account
- Navigate to Calendar Connections in your Zeeg dashboard
- Select "+ iCloud account"
- Enter your iCloud email and app-specific password
- Choose which calendars to sync for conflict checking
Once connected, whenever someone books time with you through Zeeg, the appointment appears automatically in your Apple Calendar without any manual entry required. This integration eliminates scheduling back-and-forth and protects your calendar from being overbooked.
10. Use Siri for hands-free calendar management

Apple Calendar integrates perfectly with Siri, allowing voice-controlled schedule management:
Common Siri calendar commands:
- "Hey Siri, schedule a meeting with John tomorrow at 3 PM"
- "Hey Siri, what's on my calendar today?"
- "Hey Siri, change my 2 PM appointment to 4 PM"
- "Hey Siri, cancel my dentist appointment"
- "Hey Siri, add Sarah's birthday to my calendar"
Siri can also read your upcoming events, search for specific appointments, and create more complex recurring events. This hands-free control is particularly valuable when driving, cooking, or multitasking.
11. Access your calendar anywhere with iCloud
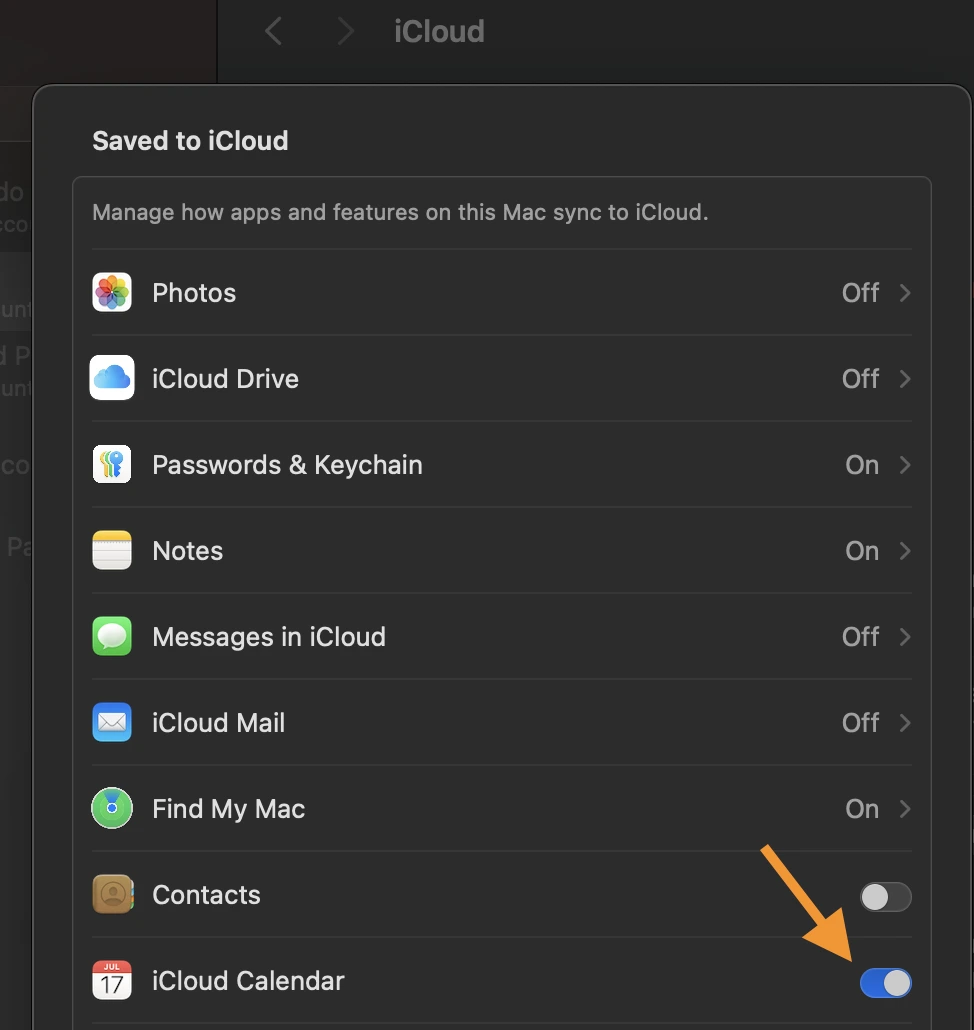
Your Apple Calendar isn't restricted to your Apple devices. With iCloud integration, you can access your schedule from anywhere:
- Ensure your calendar is syncing with iCloud:
- On Mac: Go to System Preferences > Apple ID > iCloud and check "Calendars"
- On iOS: Go to Settings > [your name] > iCloud and toggle on "Calendars"
- To access your calendar from any web browser:
- Visit iCloud.com and sign in with your Apple ID
- Click the Calendar icon
- View and edit your events just like on your devices
This web access provides a safety net for checking your schedule when your devices aren't available or when using a public or borrowed computer.
12. Use time zone management for travel and global coordination
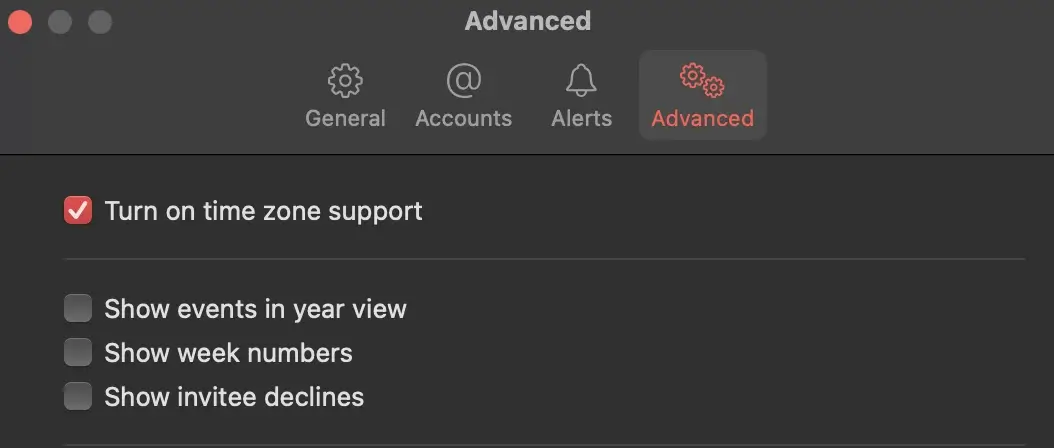
If you travel frequently or work with people across different regions, Apple Calendar's time zone features are essential:
- Enable time zone support:
- Go to Calendar > Preferences > Advanced
- Check "Turn on time zone support"
- When creating events, you can now:
- Set the time zone for each individual event
- View your calendar in different time zones
- See event times correctly regardless of your current location
- For recurring meetings with international colleagues:
- Create the event in their time zone
- Apple Calendar will automatically adjust the time in your local zone
This feature prevents confusion and missed meetings due to time zone miscalculations, especially important for remote teams or frequent travelers.
Troubleshooting common Apple Calendar issues
Even with optimal setup, you might occasionally encounter issues with Apple Calendar. Here are solutions to some common problems:
Calendar syncing problems
If your events aren't appearing across all devices:
- Check that Calendar is enabled in iCloud settings on all devices
- Force a manual sync: View > Refresh Calendars
- Ensure you're signed in with the same Apple ID everywhere
- Check your internet connection
- Try signing out of iCloud and signing back in
Missing invitations
If event invitations aren't arriving:
- Verify your contact information is correct in Contacts
- Check that your email address is properly configured
- Look in your spam folder for missed invitations
- Ensure "Show invitation messages in Notification Center" is enabled in Preferences
- For Google Calendar invitations, verify that invitations are properly forwarded to your Apple Calendar
Event editing restrictions
If you can't edit certain events:
- Check if the calendar is marked "View Only"
- Verify you created the event (you can't modify events created by others)
- Ensure your email address is correctly listed in your contact card
- For birthdays, edit the dates in Contacts, not Calendar
- Check if someone else is currently editing the shared calendar (only one person can edit at a time)
Alerts not appearing
If you're not receiving event notifications:
- Check System Preferences > Notifications to ensure Calendar alerts are enabled
- Verify that Do Not Disturb mode is off
- Check that the specific event has alerts configured
- Ensure your email address in Contacts is correct if using email alerts
- Try setting a test alert for a few minutes in the future to check functionality
Pros and cons of Apple Calendar
Before we conclude, it's worth considering the strengths and limitations of Apple Calendar to help you decide if it's the right solution for your needs.
Pros:
- Free and integrated: Comes pre-installed on all Apple devices with no additional cost
- Clean, intuitive design: Simple interface that's easy to learn and navigate
- Seamless Apple ecosystem integration: Works perfectly across all your Apple devices
- iCloud synchronization: Changes made on one device appear instantly on others
- Good basic feature set: Covers all essential calendar functions most users need daily
Cons:
- Limited customization: Fewer advanced options compared to some competitors
- Basic reporting: Lacks sophisticated analytics of your calendar usage
- Minimal project management features: Not designed for complex team coordination
- Apple ecosystem-focused: Works best within the Apple environment
- Simpler sharing options: Fewer collaborative features than some enterprise solutions
For most individual users and families, Apple Calendar provides everything needed to maintain an organized schedule. However, businesses with complex scheduling requirements might need to supplement it with more specialized tools like Zeeg for appointment scheduling or dedicated project management software.
Conclusion
Apple Calendar is a powerful tool that becomes even more useful when you understand its full capabilities. From organizing multiple calendars and setting travel time alerts to managing time zones, these tips should help you use Apple Calendar effectively and efficiently.
Nonetheless, While Apple Calendar is great at personal scheduling, there's many things it doesn't do - especially if you use calendar apps in a working context. In such cases, pairing it with Zeeg takes your calendar management to a new level. This integration solves the common frustration of scheduling meetings by eliminating back-and-forth emails about availability. Zeeg creates a professional booking page that syncs with your Apple Calendar in real-time, letting others schedule time with you based on your actual availability. With automated reminders, buffer time between meetings, and customizable booking rules, Zeeg enhances Apple Calendar's functionality where it matters most – connecting your schedule with the outside world.
By using these features and leveraging Zeeg's scheduling capabilities, you'll transform your Apple Calendar from a basic appointment tracker into a complete time management system that works effectively across all your Apple devices. You'll spend less time managing your schedule and more time focusing on what matters most in your personal and professional life.
The key to success with Apple Calendar is personalizing it to what you want. Take time to explore these features, integrate them into your workflow, and discover which combinations work best for your unique scheduling requirements. And when you're ready to eliminate scheduling hassles completely, connect your Apple Calendar with Zeeg for a truly effortless experience.


